


Rocket-Nginx is not supported by vCanopy
This is one of those things that we’ve been asked about, but don’t support. This is a use at your own risk deal if you really, really want to use WP Rocket over our server side caching.
That said and out of the way, we’ve been successful in setting this up in our testing, and here is how to set up Rocket-Nginx on vCanopy🙂
Everything that follows below is from the above github by SatelliteWP, except for one small tweak in step 4.
STEP 1. TURN OFF vCanopy CACHING AND INSTALL WP ROCKET ON YOUR WEBSITE
Be sure to turn off vCanopys page caching inside your websites configuration modal and then run a full cache clear via the self help tools. If you haven’t already, install WP Rocket on your website/s.
STEP 2. SSH INTO YOUR SERVER
Please see the following articles to get started:
Step 1. Generate your SSH Key
Step 2. Add your SSH Key to vCanopy (also see Add default SSH Keys)
Step 3. Connect to your server by SSH as Root user (we like and use Termius)
STEP 3. INSTALL ROCKET-NGINX
First, navigate to /etc/nginx:
cd /etc/nginx
And then run:
git clone https://github.com/satellitewp/rocket-nginx.git
We’ve now cloned in all the files we need to complete our Rocket-Nginx setup into /etc/nginx/rocket-nginx. Next we need to generate the default configuration. To do so, run the following three commands:
cd rocket-nginx
cp rocket-nginx.ini.disabled rocket-nginx.ini
php rocket-parser.php
The above will generate the default.conf configuration that can be included for all websites.
STEP 4. THE TWEAK FOR vCanopy
This part is the only step that differs from SatelliteWP’s installation instructions. We can now either apply this to one specific site, or all sites on the server.
To apply to only one site, create a file called “rocket-main-context.conf in your websites nginx directory with the following command:
nano /var/www/site.url/nginx/rocket-main-context.conf
Switch out “site.url” for your domain name. E.g.
nano /var/www/vCanopy.com/nginx/rocket-main-context.conf
To apply it to every website on your server you’ll need to edit the main-context.conf in /nginx/extra.d. Open it up with the following command:
nano /etc/nginx/extra.d/main-context.conf
Now in either our website or servers main-context, copy and paste the following:
 # Rocket-Nginx configuration
 include rocket-nginx/conf.d/default.conf;
Now Ctrl+O and then press enter to save the file. Then Ctrl+X to exit nano.
We now need to test our nginx syntax with:
nginx -t
If there are no errors present reload nginx with the following command:
gp ngx reload
Your Rocket-Nginx setup is now complete.
STEP 5. TESTING ROCKET-NGINX
Head inside your website and clear the WP Rocket cache and let it rebuild with the preload function located at yourwebsite.com/wp-admin/options-general.php?page=wprocket#preload
Then head to your home page in incognito mode and:
- Right click -> Inspect
- Click the network tab
- Ctrl+R to reload
- Click your website name in the left hand side at the top
- Under “Headers” scroll down until you see X-Rocket-Nginx-Serving-Static
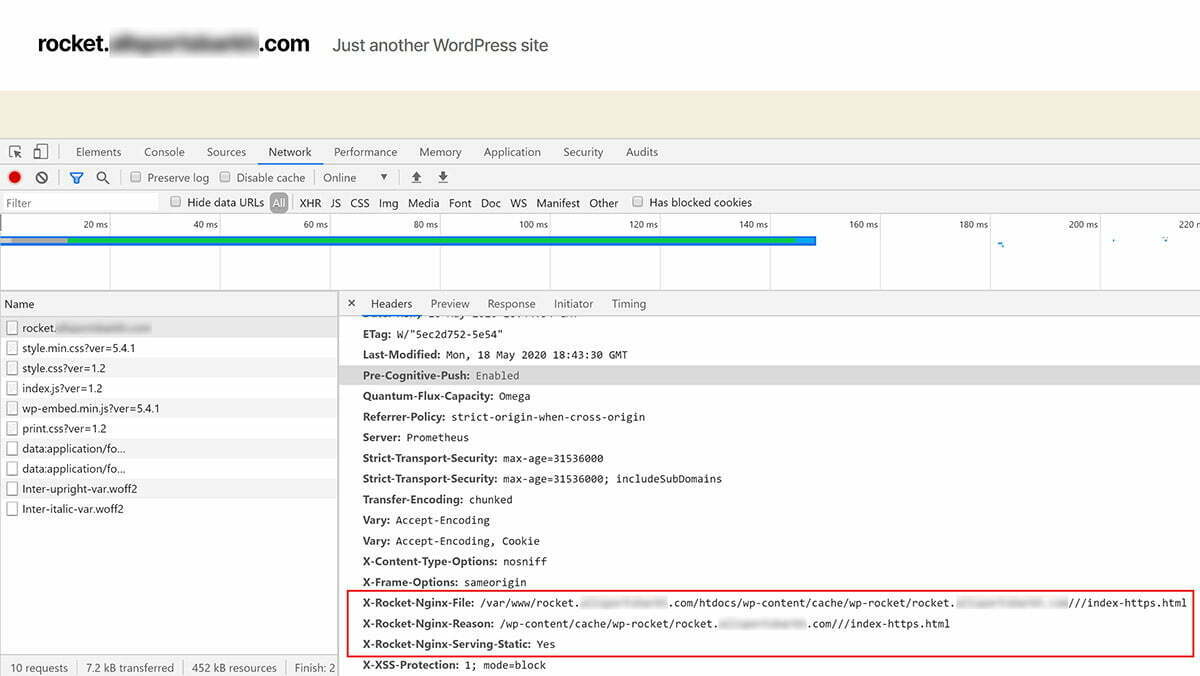
A closer look:

In the images above I’ve got a couple of extra options as I’ve turned on debug, but this isn’t necessary.
What we want to know is:
“X-Rocket-Nginx-Serving-Static: Did the configuration served the cached file directly (did it bypass WordPress): Yes or No.”
Yes is what we’re looking for (as shown above). If you got a No, then you can turn on debug below to learn more (and also try refreshing the page and checking again).
STEP 6. TURNING ON DEBUG
To turn on debug, we need to open the rocket-nginx.ini file and change the debug value from:
debug = false to -> debug = true
To do this, run the following commands:
cd /etc/nginx/rocket-nginx
nano rocket-nginx.ini
Change debug from false to true, and then Ctrl+O and then press enter to save the file. Then Ctrl+X to exit nano. Next regenerate your Nginx configuration file by running the parser:
php rocket-parser.php
Check your nginx syntax with:
nginx -t
If there are no errors present reload nginx:
gp ngx reload
This will add the following headers to your response request:
“X-Rocket-Nginx-Reason: If Bypass is set to “No”, what is the reason for calling WordPress. If “Yes”, what is the file used (URL).
X-Rocket-Nginx-File: If “Yes”, what is the file used (path on disk).”
Please refer to SatelliteWP’s github and our diagnosing caching issues article for troubleshooting.