Verdant TCS

Mitigating DoS and DDoS Attacks On Your WordPress Websites

11 min read

Introduction

DoS and DDoS attacks are rare in the grand scheme of things. There are a lot of sites on the platform, and we have a great suite of security tools, so many likely go unnoticed, or at least never come to our attention on support. Occasionally they do though, and this guide details how to quickly diagnose and put a stop to them (where possible). 

The article is broken down into 3 parts: Part 1 is theory, Parts 2 and 3 are practical. In part 3, you only need to block offending IP addresses with one of those options. I’d recommend Cloudflare if possible.

THE GOAL

The goal of this article is to first help you identify if you are in fact under attack, discover the attacking IP addresses, and then block those IP addresses.

PART 1: UNDERSTANDING ATTACKS

DoS vs DDoS Attacks

DoS and DDoS attacks aim to overwhelm a web server by flooding it with so many requests that it makes the intended site unreachable.

DOS ATTACKS

DoS stands for Denial-of-Service.

A DoS attack is typically done by a singular system, and often from a single IP address. This makes them easy to identify and mitigate. Once you know the IP, denying it access to your site/server is a simple matter.

DDOS ATTACKS

DDoS stands for Distributed Denial-of-Service.

DDoS attacks are more complicated and more difficult to mitigate, especially on already busy websites. Unlike a DoS, a DDoS attack uses multiple systems (often a botnet comprised of a network of already hacked sites) to overload a server – which is sometimes a mask for another type of attack.

A serious DDoS attack needs to be handled at the network layer, and your safest bet is to use Cloudflare for this. You can learn more here:
https://www.cloudflare.com/learning/ddos/what-is-a-ddos-attack/

Brute Force Attacks

A brute force attack is an attempt to “brute force” a way into your website by mass-testing/guessing usernames and passwords to gain access.

This can place a considerable strain on your website, especially as these attempts all hit PHP, which is all resource-intensive on the CPU.

If you have Fail2Ban active on your websites through our integration, you will likely never even notice any brute force attempts on your servers. It would take a seriously large attack to create a DoS/DDoS effect, and those are exceedingly rare.

As a side note, the best way of protecting your WordPress login is by using two-factor authentication (2FA). It won’t prevent or mitigate a brute force attack, but if one ever did succeed it would still prevent an attacker from gaining access to your website.

Mitigation: Server Level vs DNS Level Mitigation

There are essentially 3 layers where you can mitigate an attack. These are: 

  1. Mitigate at the DNS layer
  2. Mitigate via the server
  3. Attempt to block via the application, though this isn’t a viable option in most cases

Where possible it’s always better to block IPs at the DNS layer. This takes ALL of the stress off of your server so it doesn’t have to process any of the incoming traffic at any level whatsoever.

Mitigating a serious DDoS attack can only be done at the DNS layer, and your best option here is to use Cloudflare and enable their I’m Under Attack Mode DDoS protection.

On vCanopy there’s no need to do any of this at the application level so we won’t be covering this below.

PART 2. DIAGNOSING AN ATTACK

An Example from Our Support Desk: Stopping a DoS Attack, Step by Step

Recently while working on support, I took on a 360 ticket which was automatically created through our server monitoring. It was reporting that a server’s CPU usage was running at over 90%. After connecting to the server to check what was going on I opened up htop. All 4 vCPUs were continually close to 100%, and the CPU usage was all tied to one specific site on the server.

The next step was checking the access logs to see what was going on, and in this case, it was one singular IP sending thousands upon thousands of requests every single second, loading anything and everything it could across the website. This massive amount of requests didn’t take the server or website down, but it was a serious problem that needed to be handled.

On identifying this, I banned the IP at the server level, opened htop again, and almost instantly the CPU became mostly idle again. Problem solved.

On informing the client, they in turn blocked that IP at the Cloudflare on our recommendation, so those continued requests then never even reached the server.

Diagnosis Step 1: Check top and htop

Here the goal is to identify what service and/or websites are most active so that you know the next step to take in your troubleshooting.

We want to confirm that the source of the high CPU usage is due to web traffic – is it one website that’s bringing everything down? Or is it something unrelated, such as CPU steal?

For this, you’ll need to SSH into your server. Please see the following articles to get started:

Step 1. Generate your SSH Key

Step 2. Add your SSH Key to vCanopy (also see Add default SSH Keys)

Step 3. Connect to your server by SSH as Root user (we like and use Termius)

CHECKING ACTIVE PROCESSES WITH HTOP

The information presented by htop will identify the processes responsible for high resource usage on the server. By default, processes are sorted by CPU usage – the highest user at the very top of the table. To get started run:

htop

This will open up a table that looks like the following:

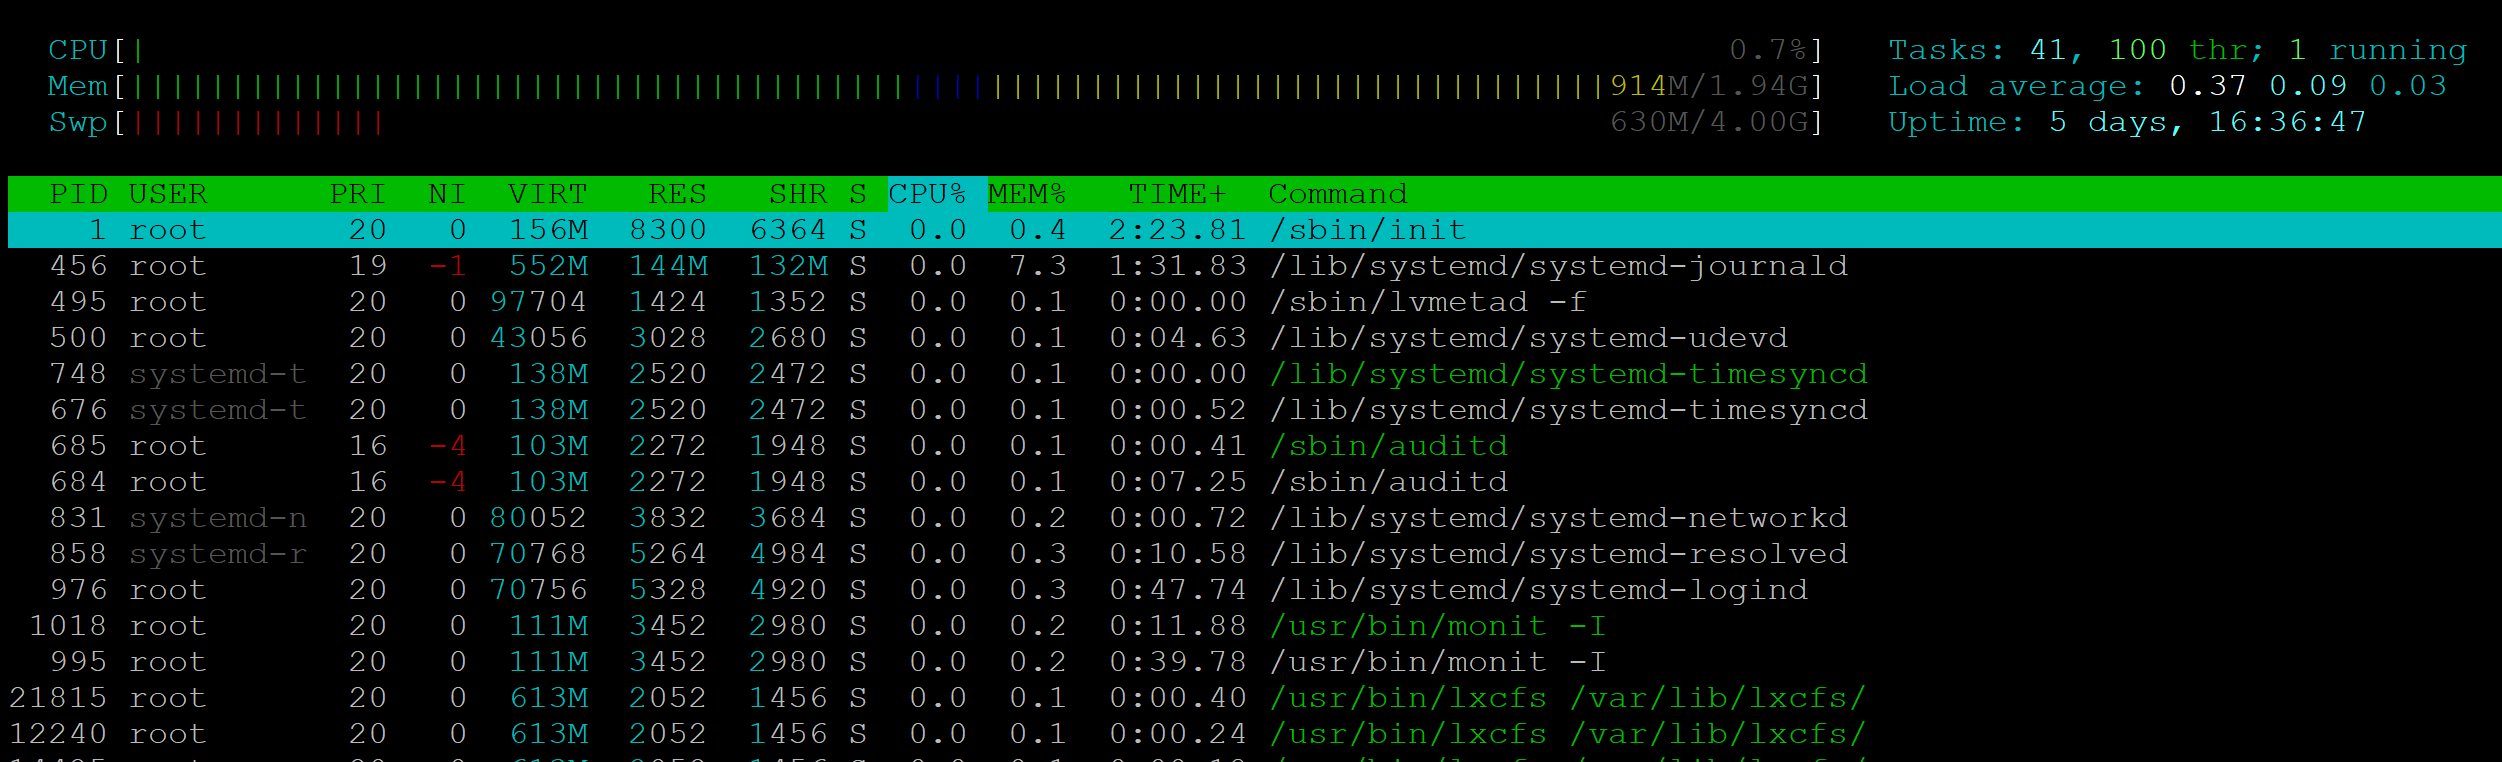
Here you’ll be able to see what’s going on and which of your websites are responsible for any high usage.

If you identify a site as being the cause, you now dig deeper into what’s going on at the website level. It may also be that a different site than you were expecting is the root of the cause, so don’t make any assumptions and approach the diagnosis with no preconceptions. To exit htop hit Ctrl+C or F10.

You can learn more about using top and htop in these articles:


RETURN AND CONTINUE MONITORING HTOP AFTER FOLLOWING THE STEPS BELOW

Once you’ve followed one of the methods below to block the attacking IP addresses again you can check htop again to  continue monitoring the load. You may need to go through the steps below multiple times if you’re dealing with a large attack.

Diagnosis Step 2: Check Your Access Logs

If your website is experiencing legitimately high traffic and it isn’t under attack, then you likely need a bigger server to handle the load, or you need to improve your caching strategy.

1. IS YOUR WEBSITE UNDER ATTACK?

The quickest way to determine whether your website is under attack is to check the website’s Error log and check the number of rate-limiting errors. If you’re being brute-forced, you’ll see something similar to the following targeting either xmlrpc.php or wp-login.php:

[23/Apr/2020:16:23:43 +0000] 69.123.145.184 1.312 - yourwebsite.com "POST //xmlrpc.php HTTP/1.1" 200 413 "-" "Mozilla/5.0 (Windows NT 10.0; Win64; x64) AppleWebKit/537.36 (KHTML, like Gecko) Chrome/78.0.3904.108 Safari/537.36"
[23/Apr/2020:16:23:46 +0000] 69.123.145.184 1.784 - yourwebsite.com "POST //xmlrpc.php HTTP/1.1" 200 413 "-" "Mozilla/5.0 (Windows NT 10.0; Win64; x64) AppleWebKit/537.36 (KHTML, like Gecko) Chrome/78.0.3904.108 Safari/537.36"
[23/Apr/2020:16:23:48 +0000] 68.123.179.184 2.624 - yourwebsite.com "POST //xmlrpc.php HTTP/1.1" 200 413 "-" "Mozilla/5.0 (Windows NT 10.0; Win64; x64) AppleWebKit/537.36 (KHTML, like Gecko) Chrome/78.0.3904.108 Safari/537.36"
[23/Apr/2020:16:23:52 +0000] 69.123.145.184 2.908 - yourwebsite.com "POST //xmlrpc.php HTTP/1.1" 200 413 "-" "Mozilla/5.0 (Windows NT 10.0; Win64; x64) AppleWebKit/537.36 (KHTML, like Gecko) Chrome/78.0.3904.108 Safari/537.36"
[23/Apr/2020:16:23:55 +0000] 69.123.145.184 2.764 - yourwebsite.com "POST //xmlrpc.php HTTP/1.1" 200 413 "-" "Mozilla/5.0 (Windows NT 10.0; Win64; x64) AppleWebKit/537.36 (KHTML, like Gecko) Chrome/78.0.3904.108 Safari/537.36"
[23/Apr/2020:16:23:57 +0000] 69.123.145.184 1.588 - yourwebsite.com "POST //xmlrpc.php HTTP/1.1" 200 413 "-" "Mozilla/5.0 (Windows NT 10.0; Win64; x64) AppleWebKit/537.36 (KHTML, like Gecko) Chrome/78.0.3904.108 Safari/537.36"
[23/Apr/2020:16:23:59 +0000] 69.123.145.184 1.864 - yourwebsite.com "POST //xmlrpc.php HTTP/1.1" 200 413 "-" "Mozilla/5.0 (Windows NT 10.0; Win64; x64) AppleWebKit/537.36 (KHTML, like Gecko) Chrome/78.0.3904.108 Safari/537.36"
[23/Apr/2020:16:29:55 +0000] 69.123.145.184 1.092 - yourwebsite.com "POST //wp-login.php HTTP/1.1" 200 6317 "https://yourwebsite.com//wp-login.php" "Mozilla/5.0 (Windows NT 10.0; Win64; x64) AppleWebKit/537.36 (KHTML, like Gecko) Chrome/78.0.3904.108 Safari/537.36"
[23/Apr/2020:16:29:57 +0000] 69.123.145.184 1.464 - yourwebsite.com "POST //wp-login.php HTTP/1.1" 200 6317 "https://yourwebsite.com//wp-login.php" "Mozilla/5.0 (Windows NT 10.0; Win64; x64) AppleWebKit/537.36 (KHTML, like Gecko) Chrome/78.0.3904.108 Safari/537.36"
[23/Apr/2020:16:29:59 +0000] 69.123.145.184 1.444 - yourwebsite.com "POST //wp-login.php HTTP/1.1" 200 6317 "https://yourwebsite.com//wp-login.php" "Mozilla/5.0 (Windows NT 10.0; Win64; x64) AppleWebKit/537.36 (KHTML, like Gecko) Chrome/78.0.3904.108 Safari/537.36"
[23/Apr/2020:16:30:00 +0000] 69.123.145.184 1.352 - yourwebsite.com "POST //wp-login.php HTTP/1.1" 200 6317 "https://yourwebsite.com//wp-login.php" "Mozilla/5.0 (Windows NT 10.0; Win64; x64) AppleWebKit/537.36 (KHTML, like Gecko) Chrome/78.0.3904.108 Safari/537.36"
[23/Apr/2020:16:30:02 +0000] 69.123.145.184 1.612 - yourwebsite.com "POST //wp-login.php HTTP/1.1" 200 6317 "https://yourwebsite.com//wp-login.php" "Mozilla/5.0 (Windows NT 10.0; Win64; x64) AppleWebKit/537.36 (KHTML, like Gecko) Chrome/78.0.3904.108 Safari/537.36"
[23/Apr/2020:16:30:05 +0000] 69.123.145.184 2.264 - yourwebsite.com "POST //wp-login.php HTTP/1.1" 200 6317 "https://yourwebsite.com//wp-login.php" "Mozilla/5.0 (Windows NT 10.0; Win64; x64) AppleWebKit/537.36 (KHTML, like Gecko) Chrome/78.0.3904.108 Safari/537.36"
[23/Apr/2020:16:30:06 +0000] 69.123.145.184 1.604 - yourwebsite.com "POST //wp-login.php HTTP/1.1" 200 6317 "https://yourwebsite.com//wp-login.php" "Mozilla/5.0 (Windows NT 10.0; Win64; x64) AppleWebKit/537.36 (KHTML, like Gecko) Chrome/78.0.3904.108 Safari/537.36"

If you’re not using XML RPC and it’s getting hit, you can disable it inside your website’s customizer. Open it up and then click through to the Security tab, and then to the additional measures. Click the XML RPC toggle.

If you’re not already using WPFail2Ban, you should activate this too.

2.1 DISCOVER ATTACKING IPS ON NGINX

Next, check your access logs on your server with the following commands. The first two will check for IPs hitting xmlrpc.php and wp-login.php, and the third will list IPs accessing your server as a whole.

Check for hits on xmlrpc.php:
cat /var/log/nginx/*access.log | grep xmlrpc | awk '{print $1}' | sort | uniq -c
Check for hits on wp-login.php:
cat /var/log/nginx/*access.log | grep wp-login | awk '{print $1}' | sort | uniq -c
Check overall access for the day:

Here you’ll need to replace the date with the actual current date:

cat /var/log/nginx/*access.log | grep '11/Dec/2021' | sudo awk '{ print $1}' | sort | uniq -c | sort -nr

Here you may see some IPs with hundreds or thousands of hits on your website. If that’s the case, run this to display the top 50:

cat /var/log/nginx/*access.log | grep '11/Dec/2021' | sudo awk '{ print $1}' | sort | uniq -c | sort -nr | head -n 50

2.2 DISCOVER ATTACKING IPS ON OPENLITESPEED

Check for hits on xmlrpc.php:
cat /var/log/ols/*access.log | grep xmlrpc | awk '{print $1}' | sort | uniq -c
Check for hits on wp-login.php:
cat /var/log/ols/*access.log | grep wp-login | awk '{print $1}' | sort | uniq -c
Check overall access for the day:

Here you’ll need to replace the date with the actual current date:

cat /var/log/ols/*access.log | grep '11/Dec/2021' | sudo awk '{ print $1}' | sort | uniq -c | sort -nr

Here you may see some IPs with hundreds or thousands of hits on your website. If that’s the case, run this to display the top 50:

cat /var/log/ols/*access.log | grep '11/Dec/2021' | sudo awk '{ print $1

PART 3. MITIGATING AN ATTACK

The Cloudflare Proxy and Banning IPs with Cloudflare

Blocking IP addresses is straightforward with Cloudflare. We can do this by adding a firewall rule for your website.

This can be a new rule or you can add simply add the following to a rule that already exists and is using Block as the action.

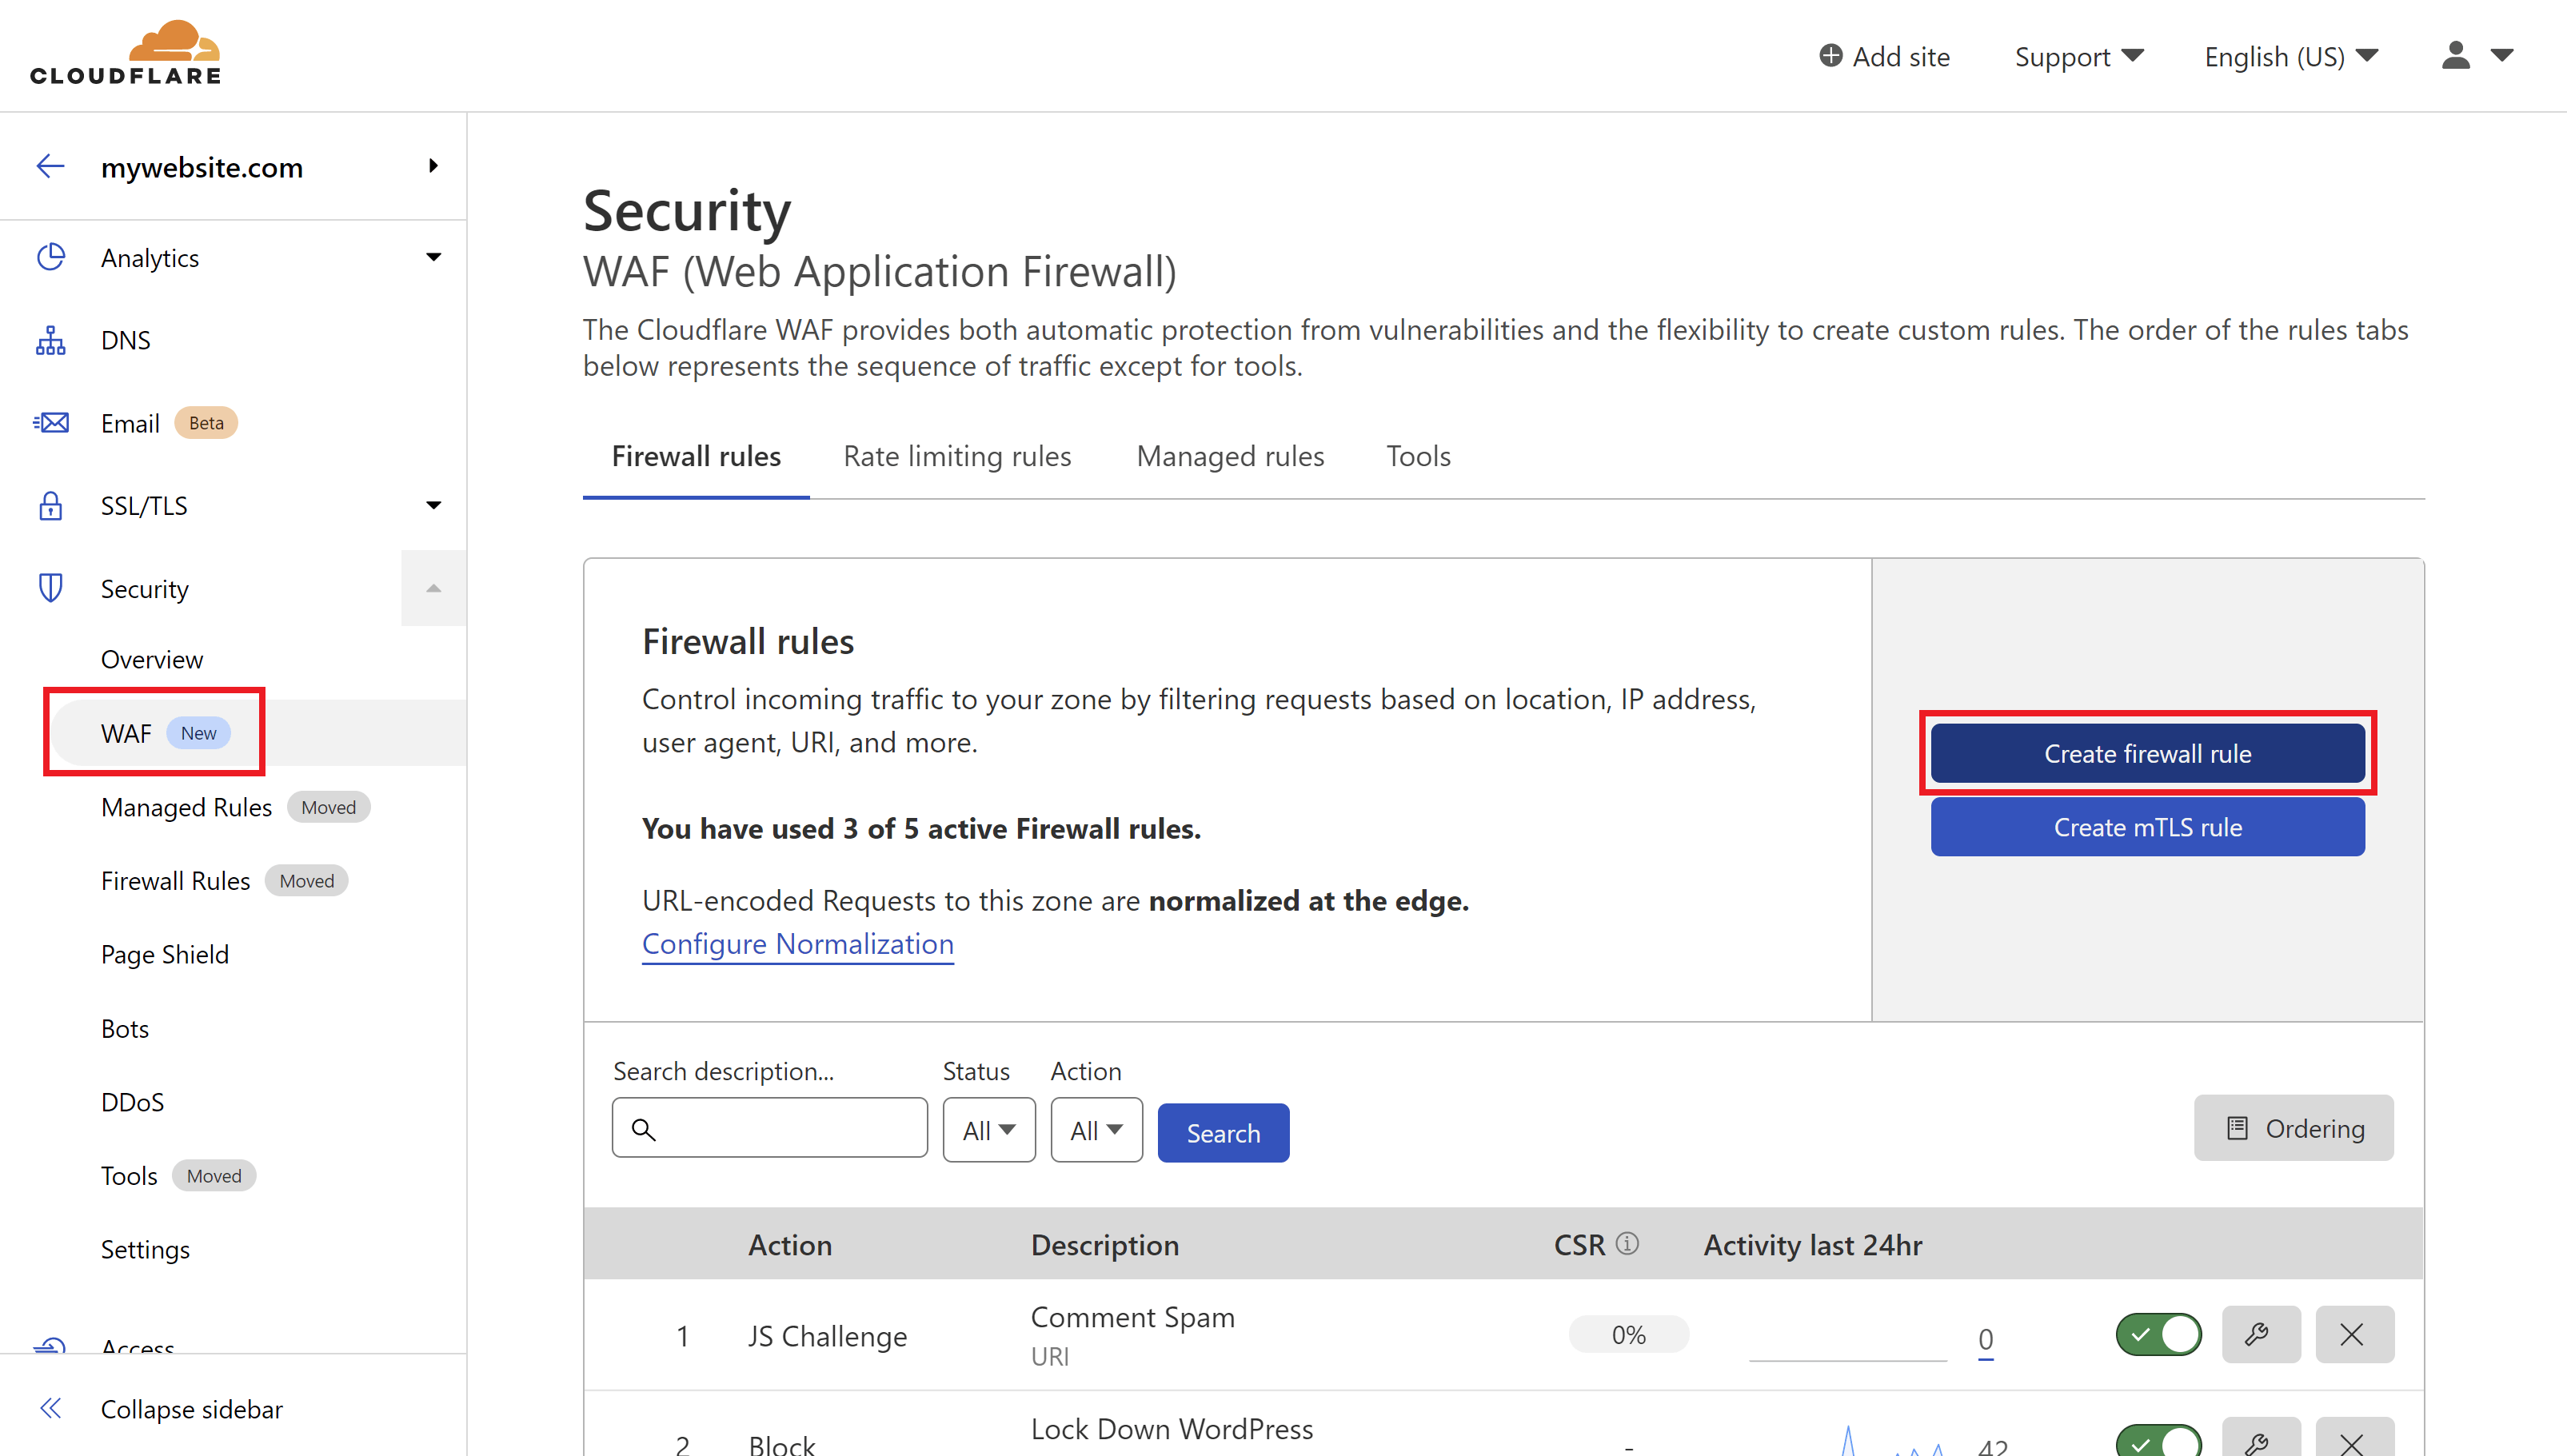
STEP 1. CREATE A CLOUDFLARE FIREWALL RULE

Navigate to the Security > WAF page, and click the Create Firewall Rule button.

STEP 2. CONFIGURE YOUR FIREWALL EXPRESSION

First, give your rule an easy to identify name.
Next,

  • Field: IP Source Address
  • Operator: “is in
  • Value: Enter your IP address/es here

The default action should be set to Block, which is what we want to do.

Click the Deploy firewall rule button once your rule is ready.

Mitigate DDoS Attacks with Cloudflare

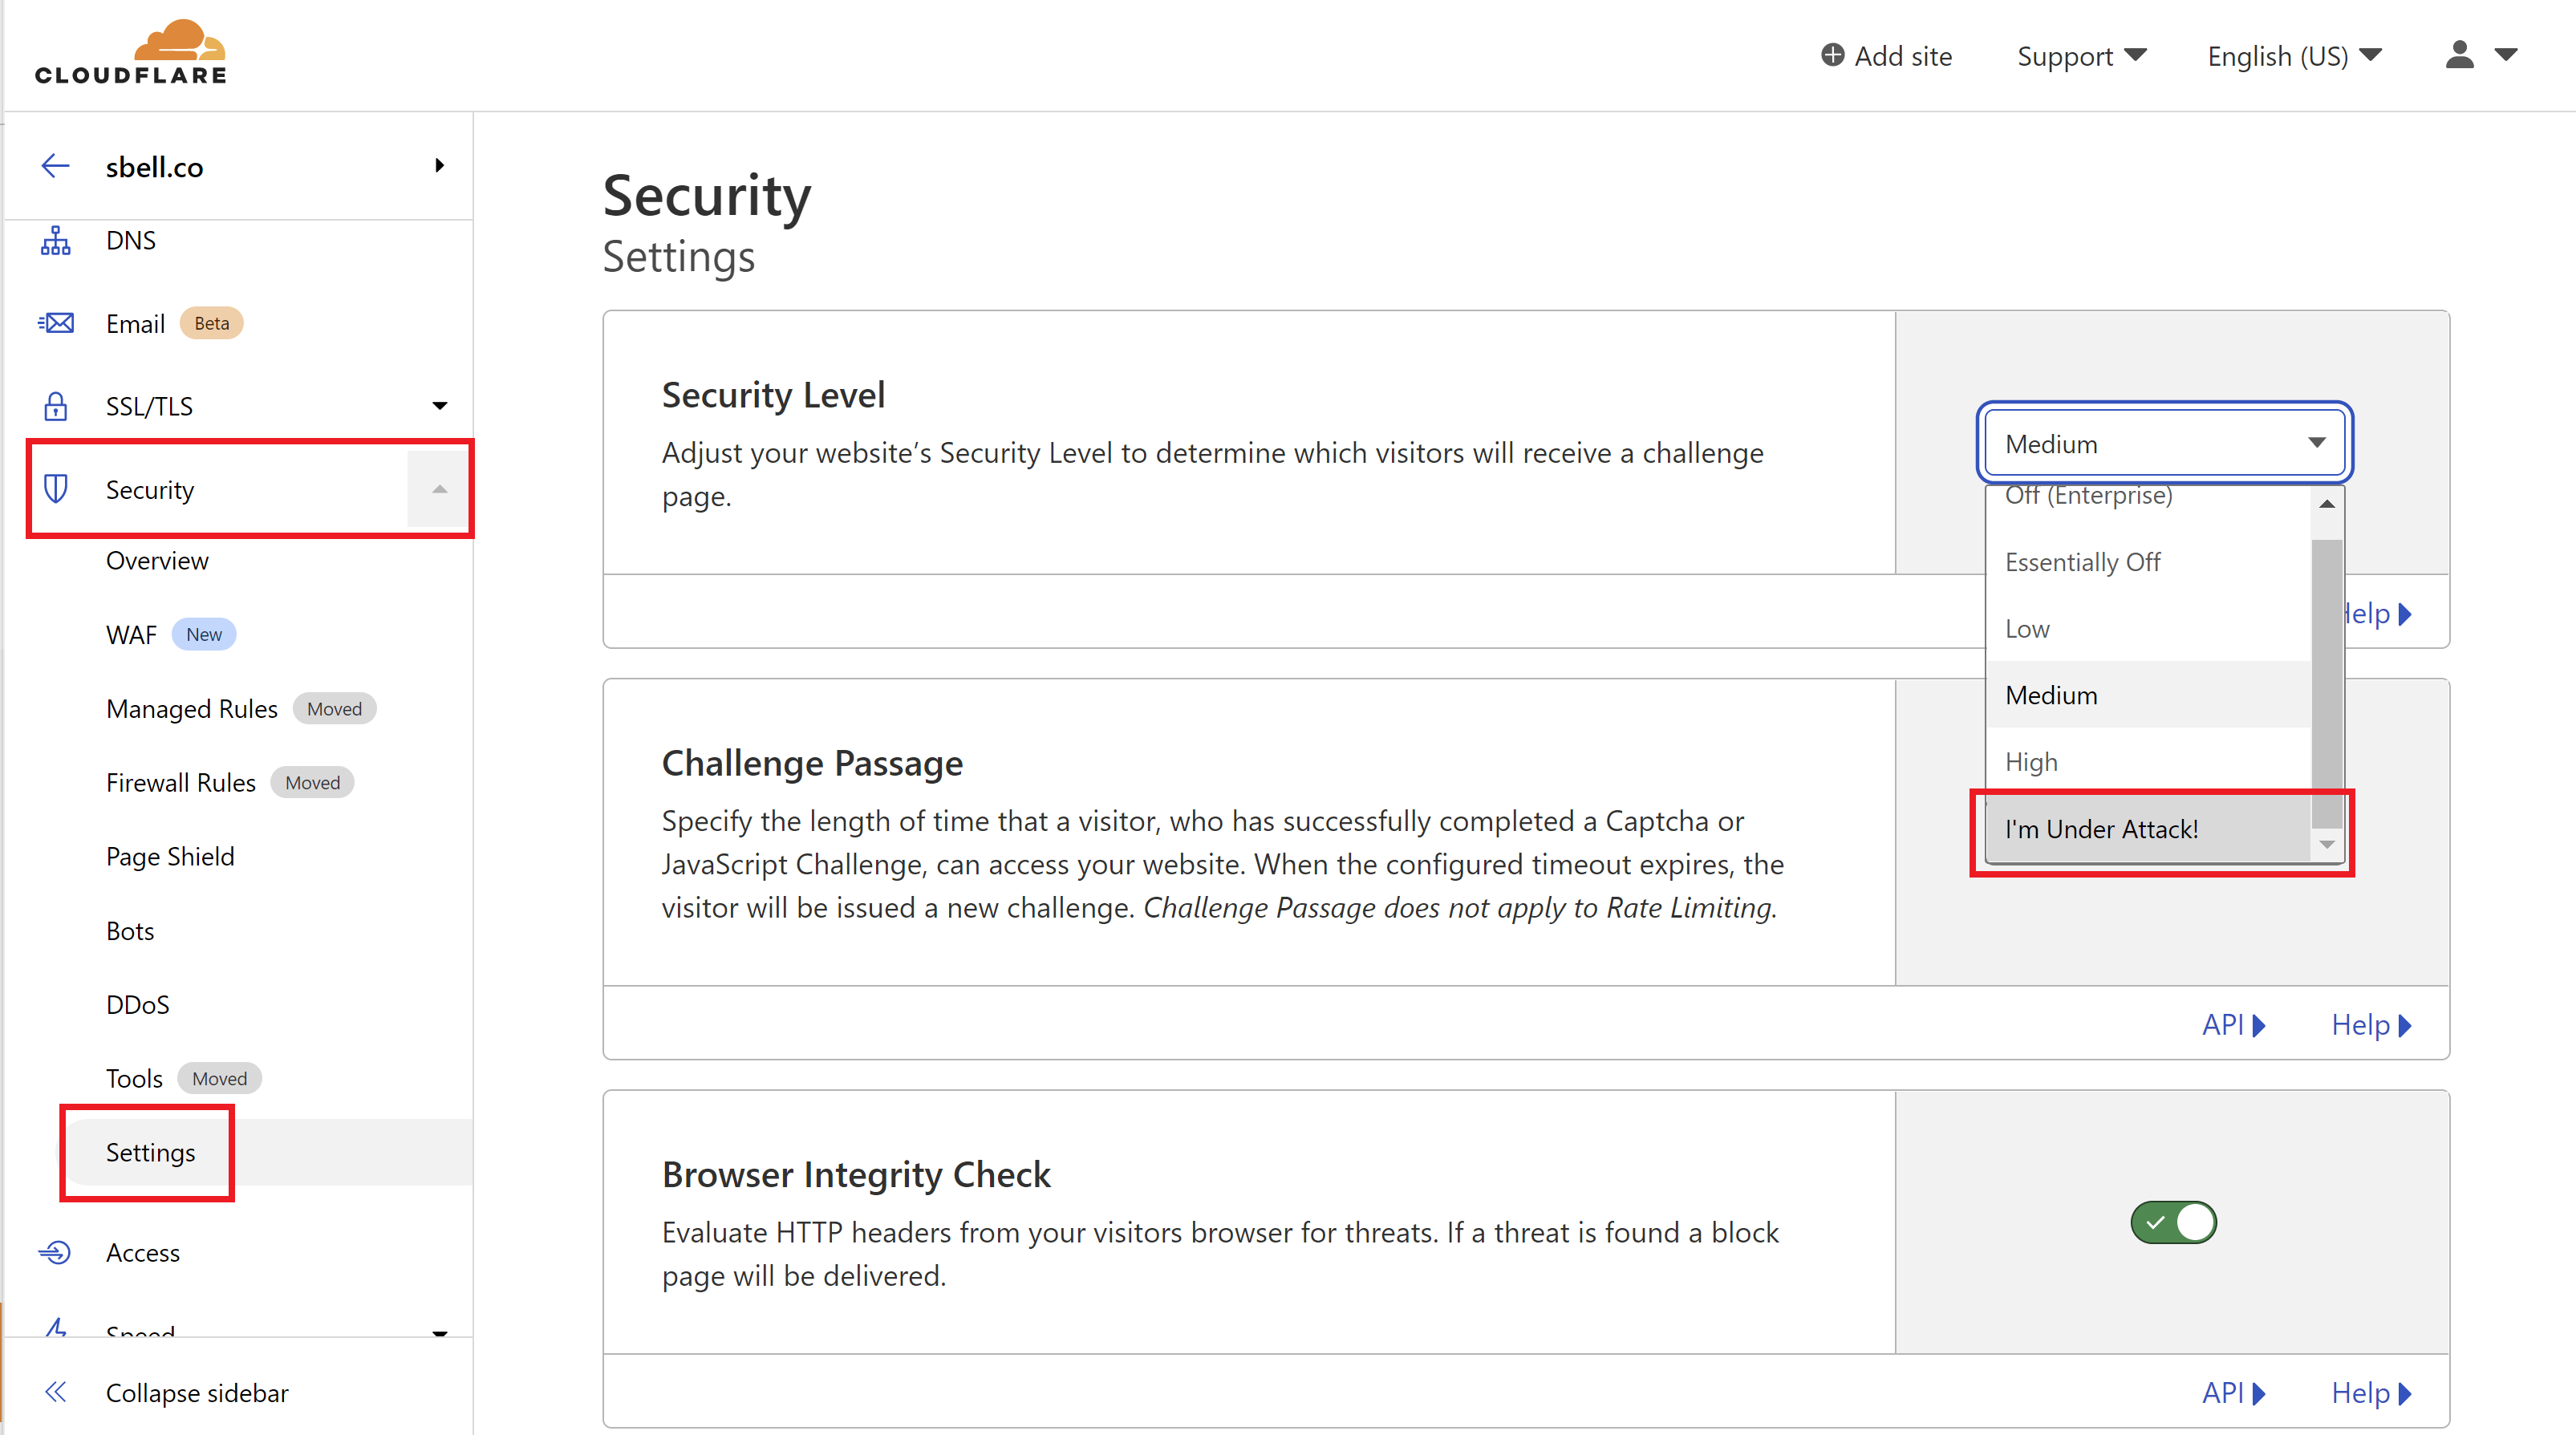
If your website is behind Cloudflare, their proxy service offers DDoS protection by default. Cloudflare Under Attack Mode performs additional security checks to help mitigate DDoS attacks. You can enable I’m Under Attack Mode via the following steps:
  1. Log in to your Cloudflare account.
  2. Select the domain to protect.
  3. Select the Security dropdown.
  4. Click Settings.
  5. Under Security Level, select I’m Under Attack!
INCREASE DDOS SENSITIVITY
You can also increase DDoS sensitivity, which may be advisable if you are currently under attack. You can find this setting under:
  1. Security
  2. DDoS
  3. Click Configure
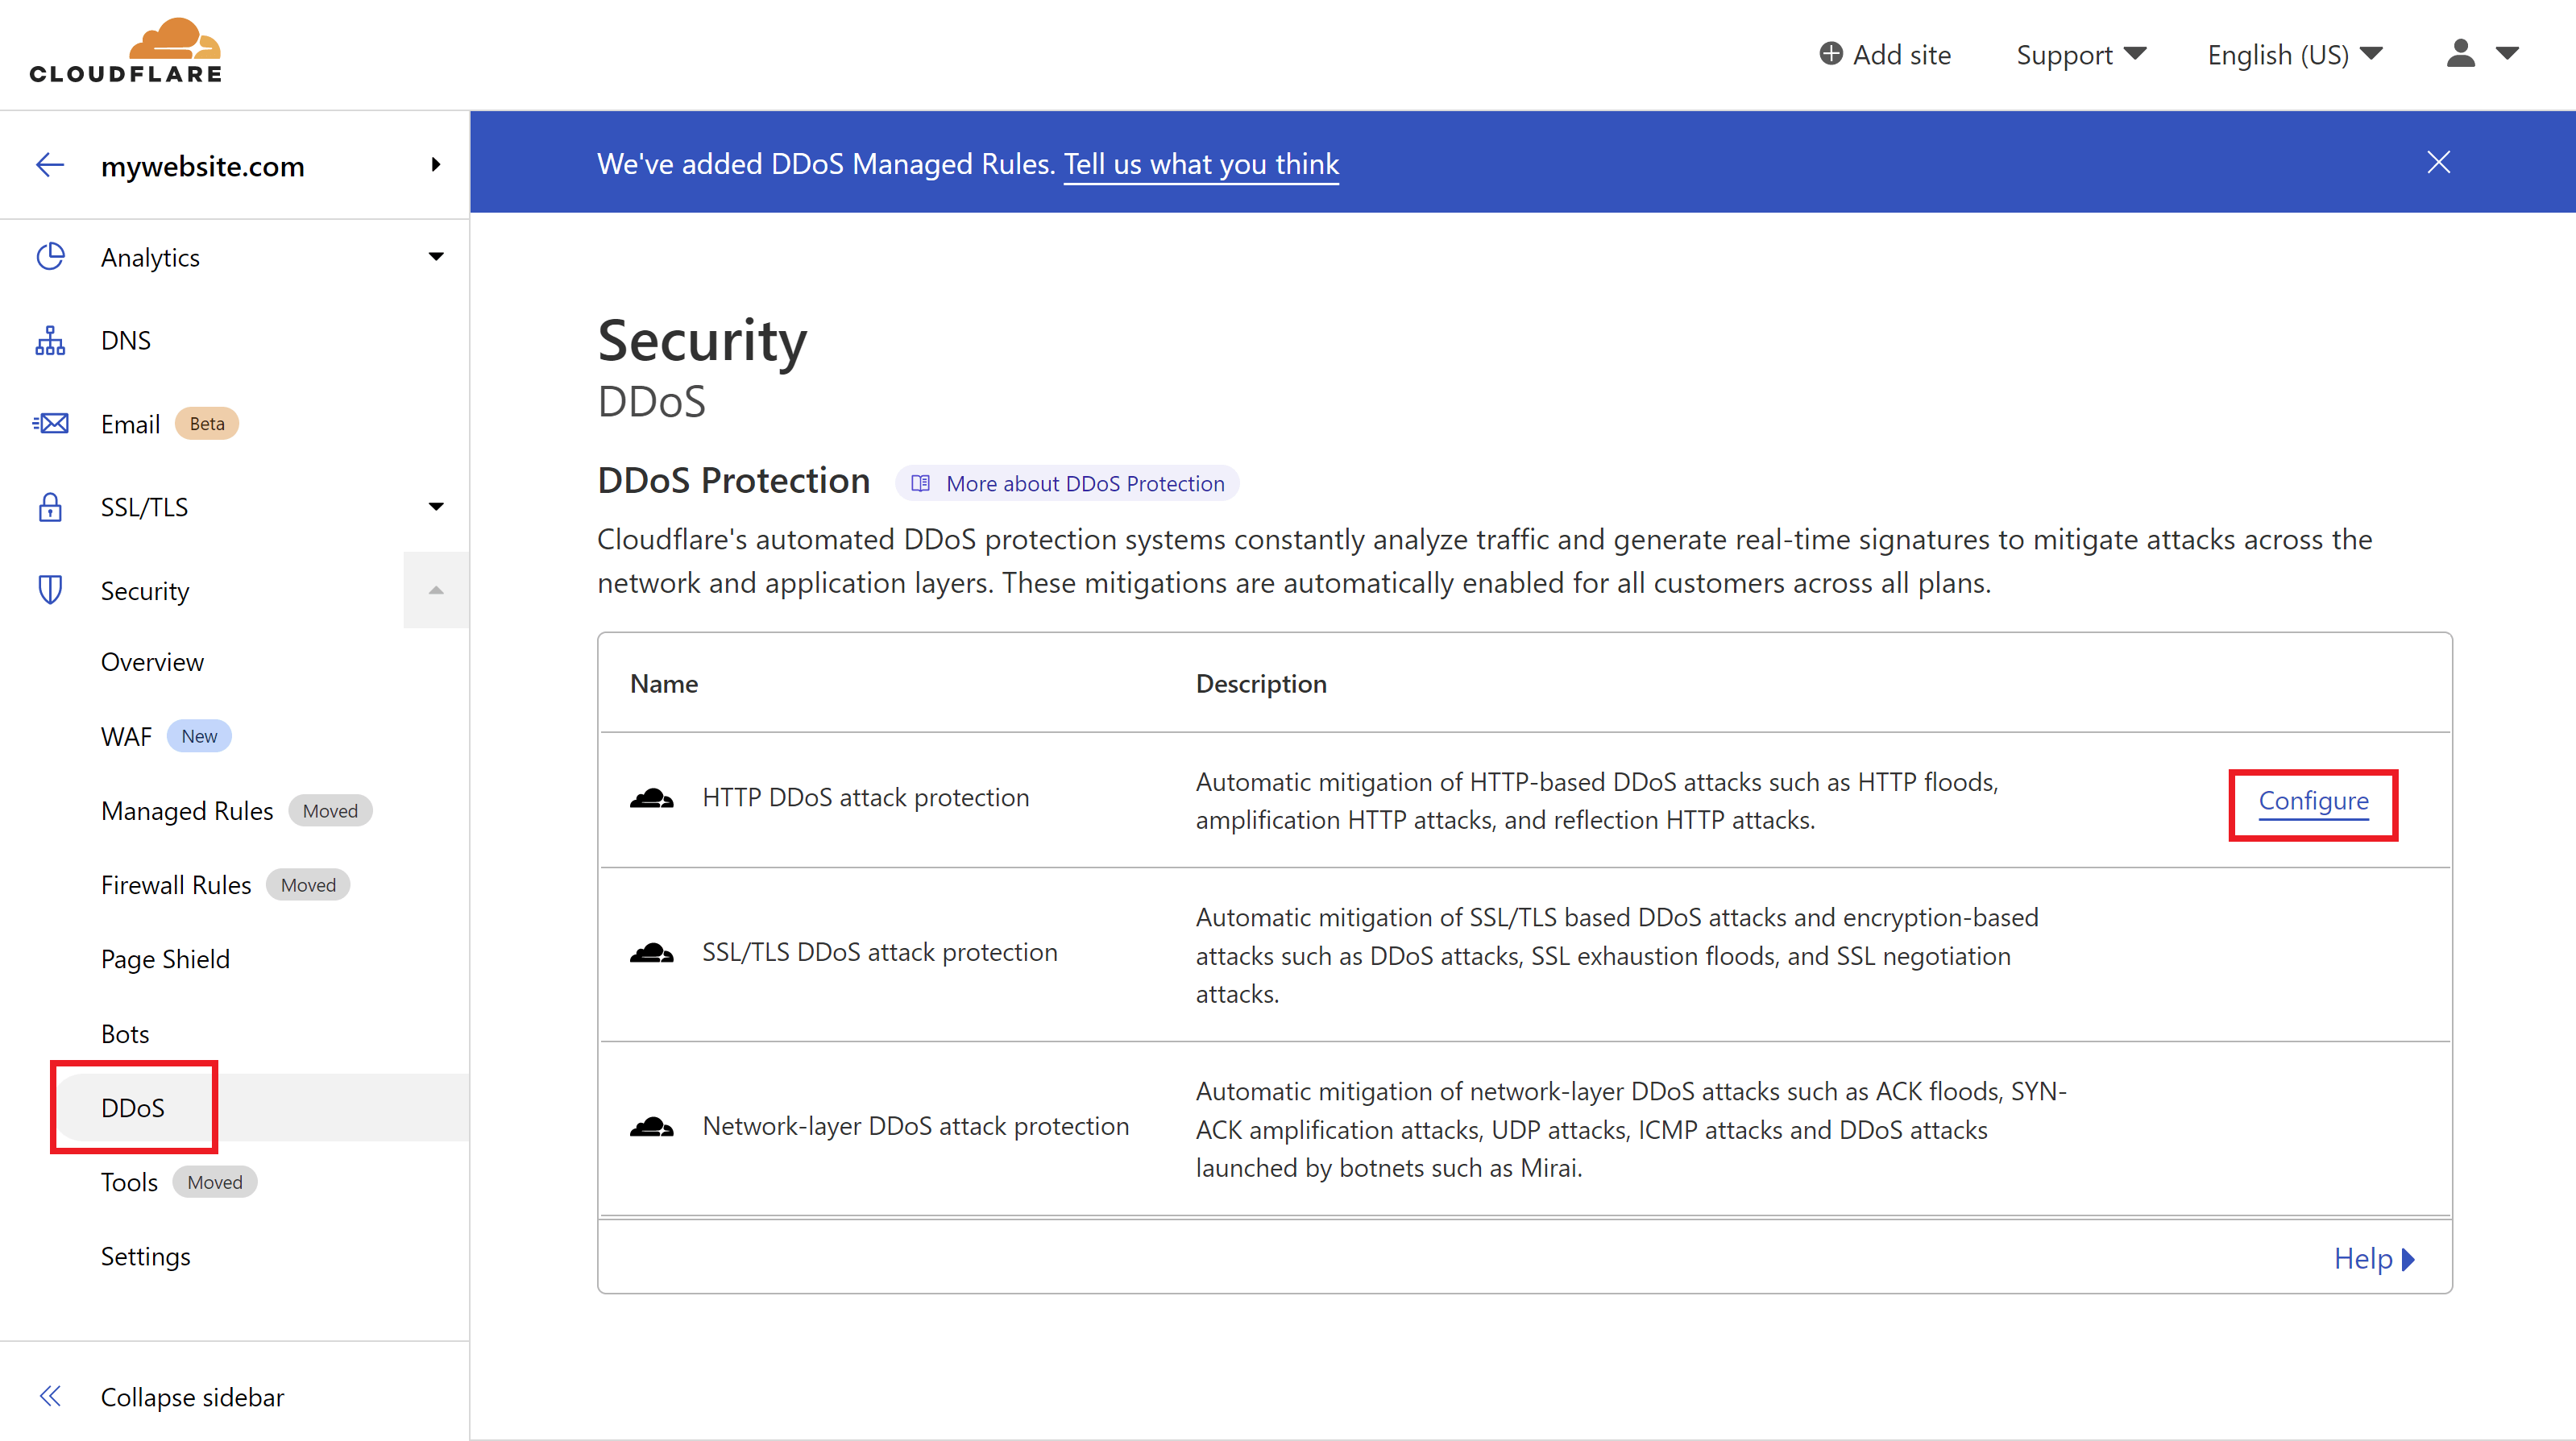
Here you’ll find a dropdown where you can adjust the ruleset sensitivity: 
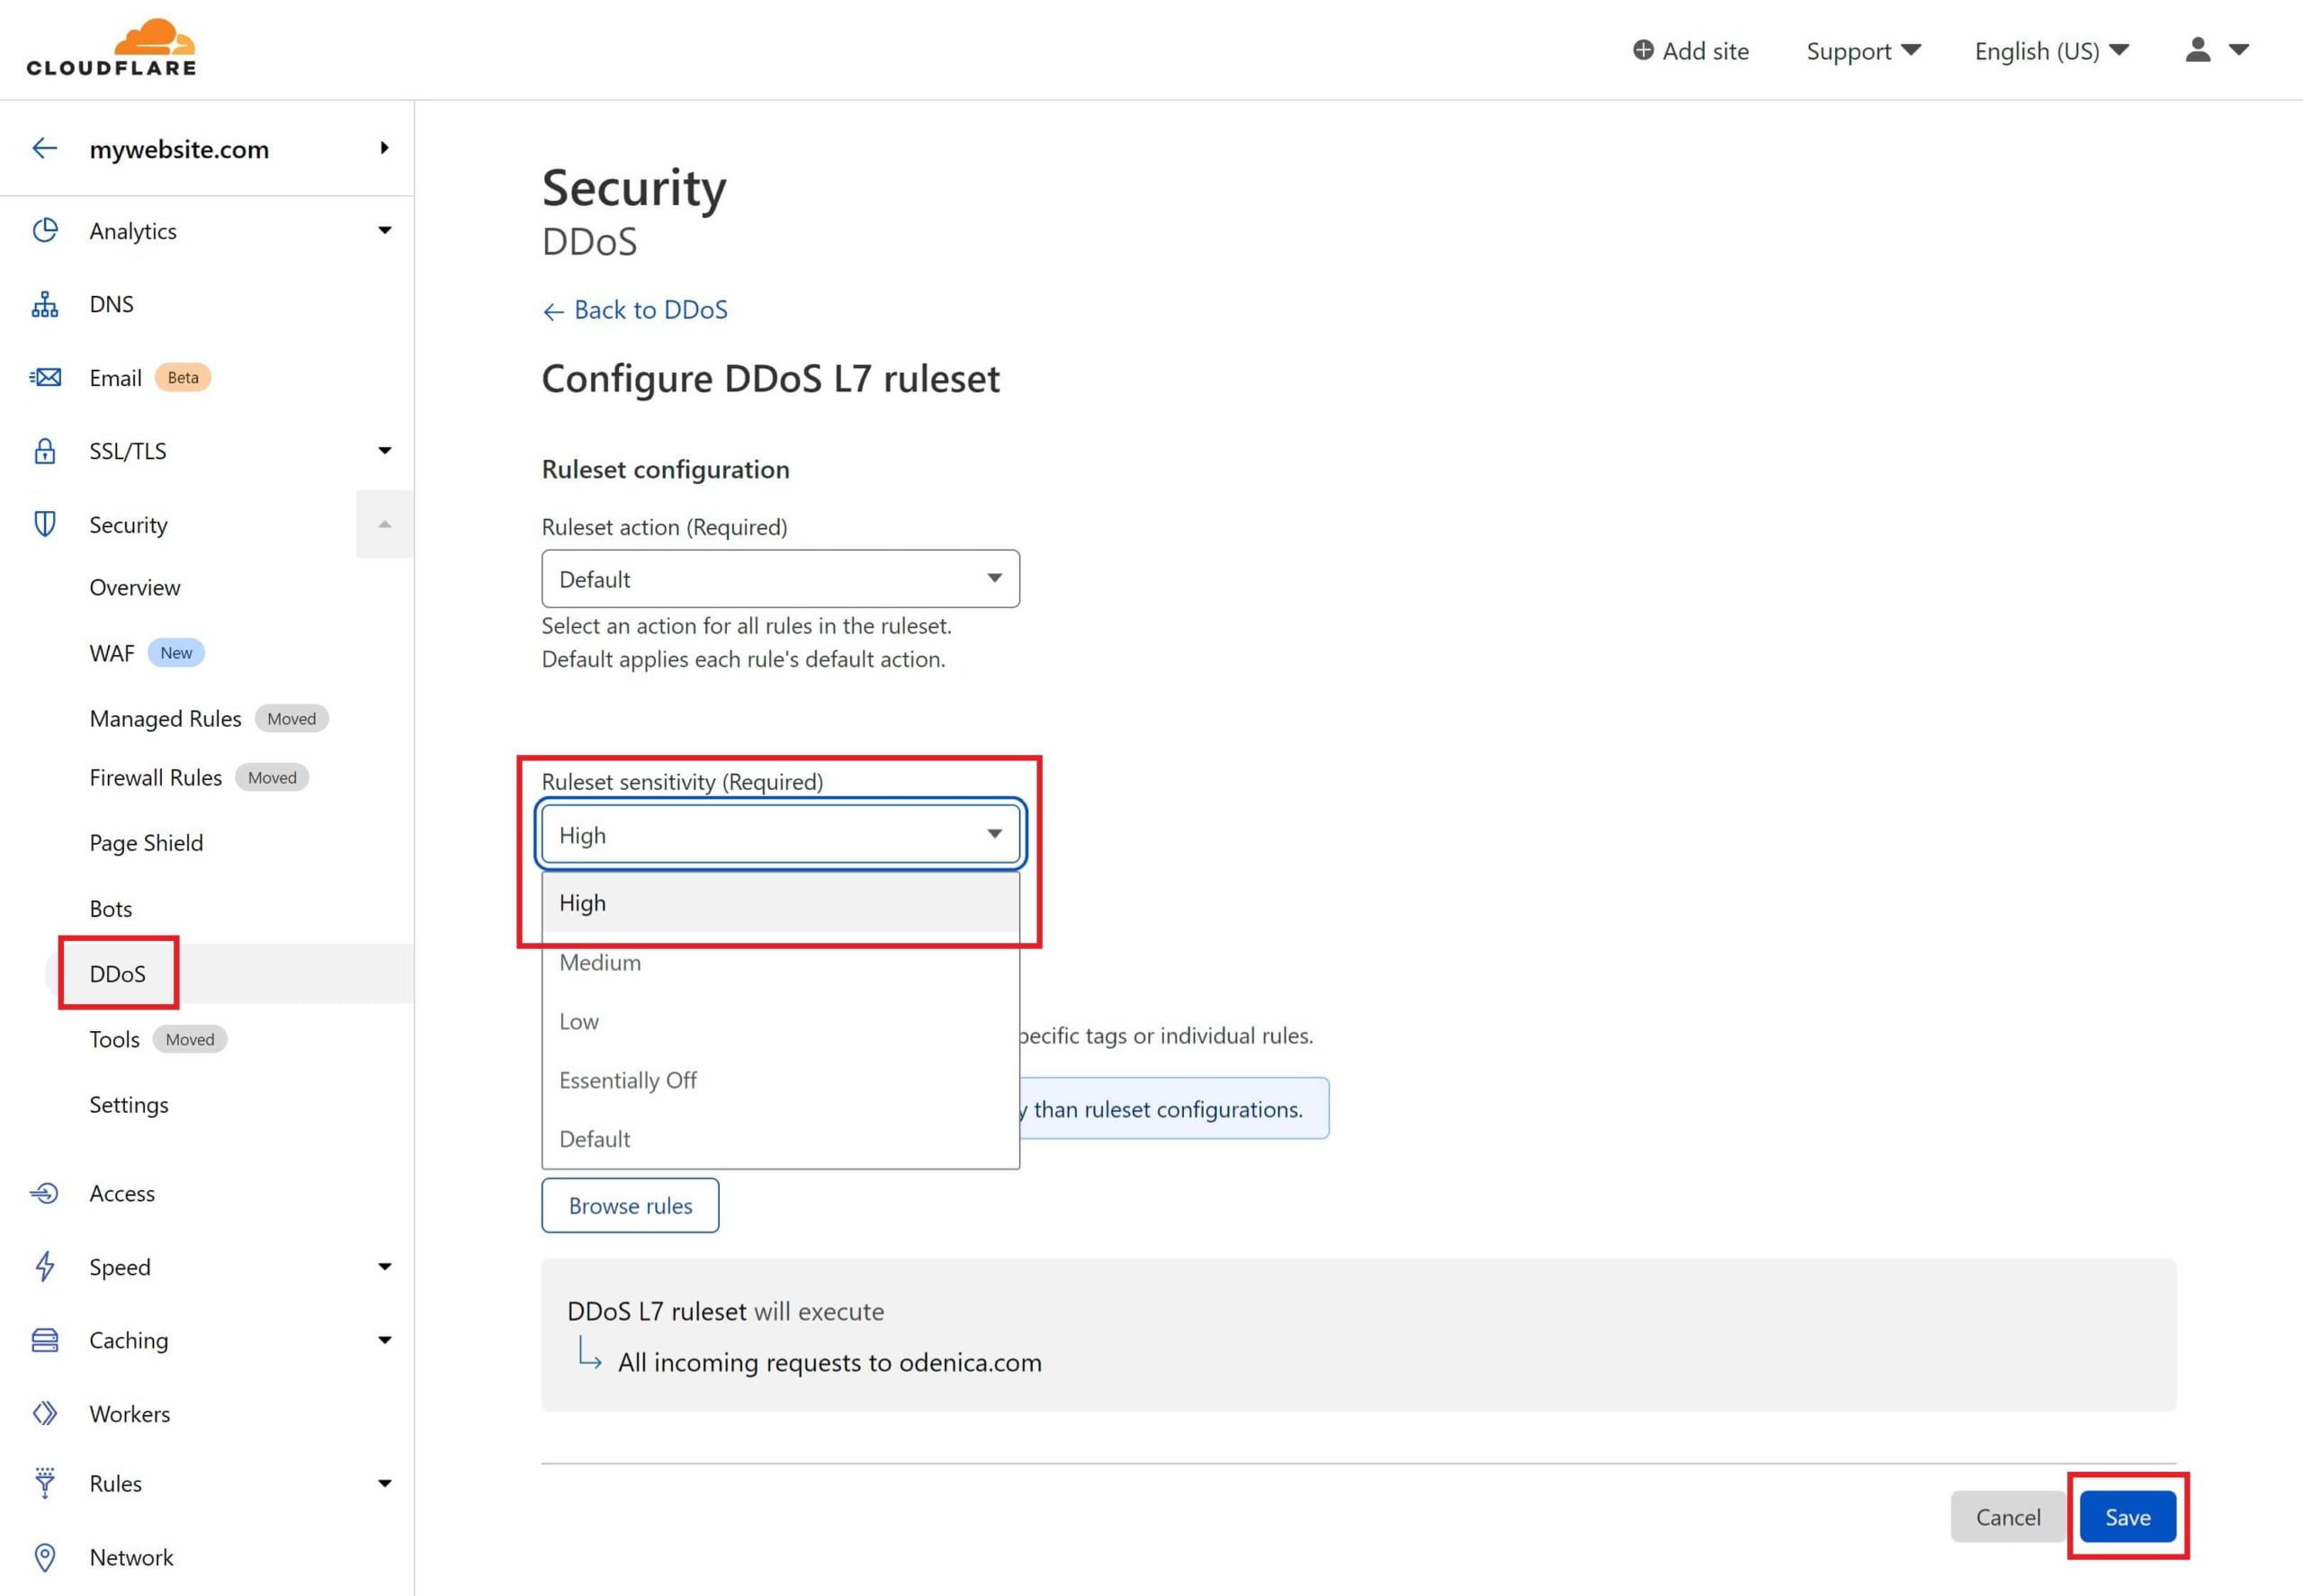
Click Save and you’re set. You may wish to adjust this back down at a later time when the attack is over.

Banning IPs with the Linux UFW

by running the following command on your server:

ufw deny from {IP.Address}

For example:

ufw deny from 199.199.199.19

Banning IPs with Fail2Ban

You can manually ban an IP address directly on the server. Run the following command, replacing the actual IP address:

fail2ban-client set wordpress-extra banip {ip-address}

You can change the jail if you wish to do so, but the ban time for the wordpress-extra jail is 24 hours (86400 seconds). You can find each of the 5 jail names listed in part 3 above, and you could also create your own jail.

For example:

fail2ban-client set wordpress-extra banip 199.199.199.199

Banning IPs with Nginx Rules

Banning IP addresses with Nginx rules can be done at either the server level (all sites on the server) or the site level.

BLOCK AT THE SERVER LEVEL

To block at the server level you can use the http-context.conf. To customize this config, run the following command:

nano /etc/nginx/extra.d/http-context.conf

Add your IP as follows (or if multiple IPs, then 1 per line):

deny 199.199.199.19;
deny 123.123.123.45;

Save the file with CTRL+O followed by Enter. Exit nano with CTRL+X.

Now copy the file into the _custom directory to ensure it’s not overwritten:

cp /etc/nginx/extra.d/http-context.conf /etc/nginx/extra.d/_custom/http-context.conf

Now check your Nginx syntax with:

nginx -t

As long as there are no errors present you can then reload Nginx with:

gp ngx reload
BLOCK AT THE WEBSITE LEVEL

To block at the site level, you can use the *-main-context.conf include. Run the following command to create your configuration (replacing site.url with your URL):

nano /var/www/site.url/nginx/blockip-main-context.conf

Add your IP as follows (or if multiple IPs, then 1 per line):

deny 199.199.199.19;
deny 123.123.123.45;

Save the file with CTRL+O followed by Enter. Exit nano with CTRL+X.

Now check your Nginx syntax with:

nginx -t

As long as there are no errors present you can then reload Nginx with:

gp ngx reload

Banning IPs on OpenLiteSpeed

On OpenLiteSpeed, when denying IPs at the server level it will close its connection so nothing gets hit on the server. If you deny at the site level, a 403 HTTP Error will be served. Full details on Allowing/Denying IPs on OpenLiteSpeed can be found here: Allow or Deny IP Addresses on OpenLiteSpeed Like on Nginx, you can block IPs at the server level or the site level.
BLOCK AT THE SERVER LEVEL
The server-wide configuration is located here:
/usr/local/lsws/conf/ip_deny.conf
ADD YOUR IP/S
To edit either file, open them with nano like so:
nano /usr/local/lsws/conf/ip_deny.conf
Add one IP address per line, then hit CTRL+O followed by Enter to save the file, and CTRL+X to exit nano.
RESTART OLS
For the changes to take effect you will first need to restart OLS. Restart and regenerate the server configuration with the following command:
gpols httpd
BLOCK AT THE SITE LEVEL
The site-specific config is located here (replace “site.url” with your domain name):
/var/www/site.url/ols/ip_deny.conf
ADD YOUR IP/S
To edit either file, open them with nano like so:
nano /var/www/site.url/ols/ip_deny.conf
Add one IP address per line, then hit CTRL+O followed by Enter to save the file, and CTRL+X to exit nano.
RESTART OLS
For the changes to take effect you will first need to restart OLS. Restart and regenerate the website configuration with this command (replace “site.url” with your domain name):
gpols site site.url

Search the Knowledge Base

New to vCanopy?

Get started with our FREE Core plan today! We bring the software, you bring the hardware.