


Part 1. Exporting Your Database
If your database is small, PHPMyAdmin should work perfectly well for exporting and importing your database. If you have a large database, however, exporting via the command line will be necessary.
EXPORTING VIA PHPMYADMIN
Head over to PHPMyAdmin in your current hosting account and log in. If you’re using cPanel or Plesk, simply clicking on the icon in your account should log you right in.
If you’re using a managed hosting server, the login details are usually available inside your account in your website’s specific page. If you can’t find them, a quick Google search for “host-name PHPMyAdmin login” should provide the info you need on locating these details.
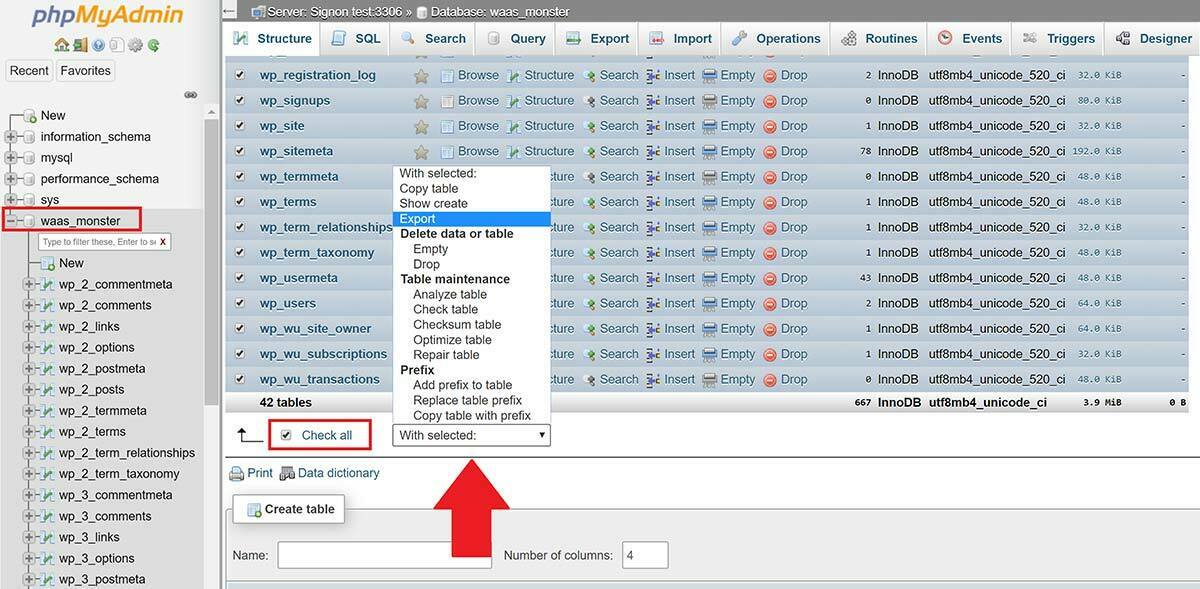
Once logged in, click “Databases” at the top of the page.

In the left-hand sidebar you can see the databases available. Select your website’s database (in this example the website is “waas.monster”.
Once inside your database, scroll down to the bottom and check the “Check all” box, and then select the export option from the dropdown to the right of the check box.
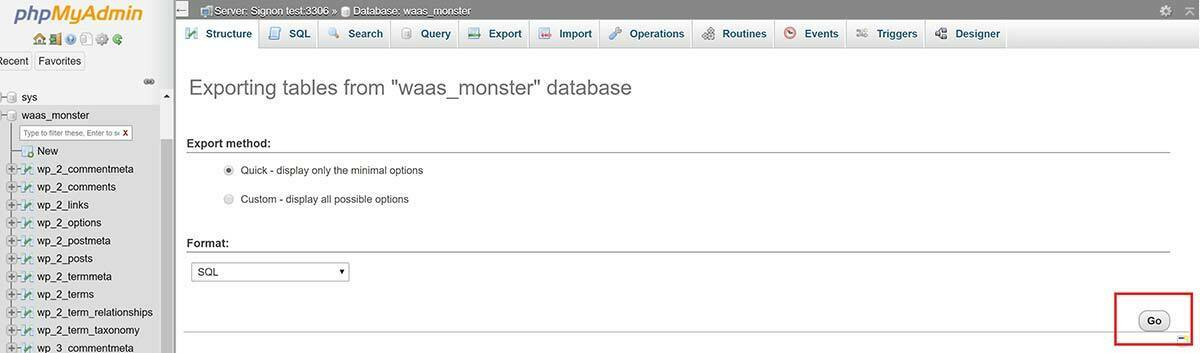
PHPMyAdmin will take you to a new page as shown below. Click “Go” and it will automatically start the download of your database.
You can move on to part 2.
EXPORTING VIA WP-CLI
If your host supports it, this is quicker and easier than exporting via MySQL.
Navigate to your /htdocs folder and run the following command:
wp db export database.sql --all-tablespaces --add-drop-table
EXPORTING VIA MYSQL ON THE COMMAND LINE
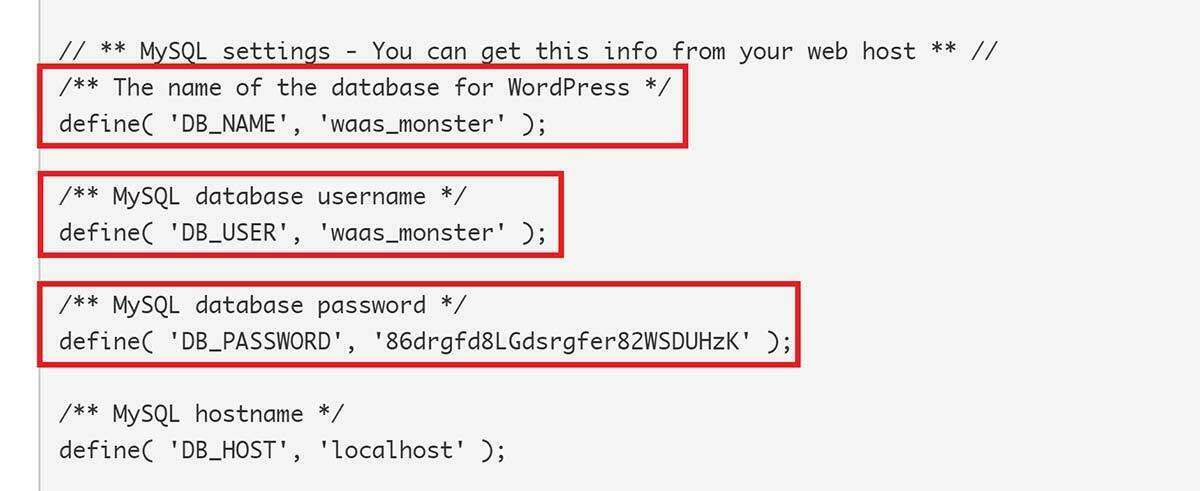
For this, you’ll need to open up your wp-config.php file and then connect to your server.
Your wp-config file contains the database username, database name, and database password. We’ll need all three to run our export.
Inside your server, navigate to your /htdocs folder (so we can export the database with the rest of the files and import via WP CLI later on) and run the following command, switching out “USER_NAME” and “DATABASE_NAME” for your actual details:
mysqldump --opt -u USER_NAME -p DATABASE_NAME > database.sql
Example:
mysqldump --opt -u waas_monster -p waas_monster > database.sql
You’ll be prompted for your password, copy and paste in your password from your wp-config here.
Your server will create the file “database.sql”.
Part 2. Export Your Website Files from Your Current Host
To migrate, we’ll need to copy all of the files in our WordPress installation, and your database if you exported this via the command line.
This includes your themes, plugins, uploads (images, etc), and any other files which have been added to your /wp-content directory. If you’ve used a backup plugin before you may want to check to see if you have any backups stored here and remove any that aren’t necessary to reduce the size of your download.
If your website is relatively small and simple, you’re probably fine just copying the /wp-content folder, but it’s a safer bet to transfer ALL files and it’s not much (if any) extra work.
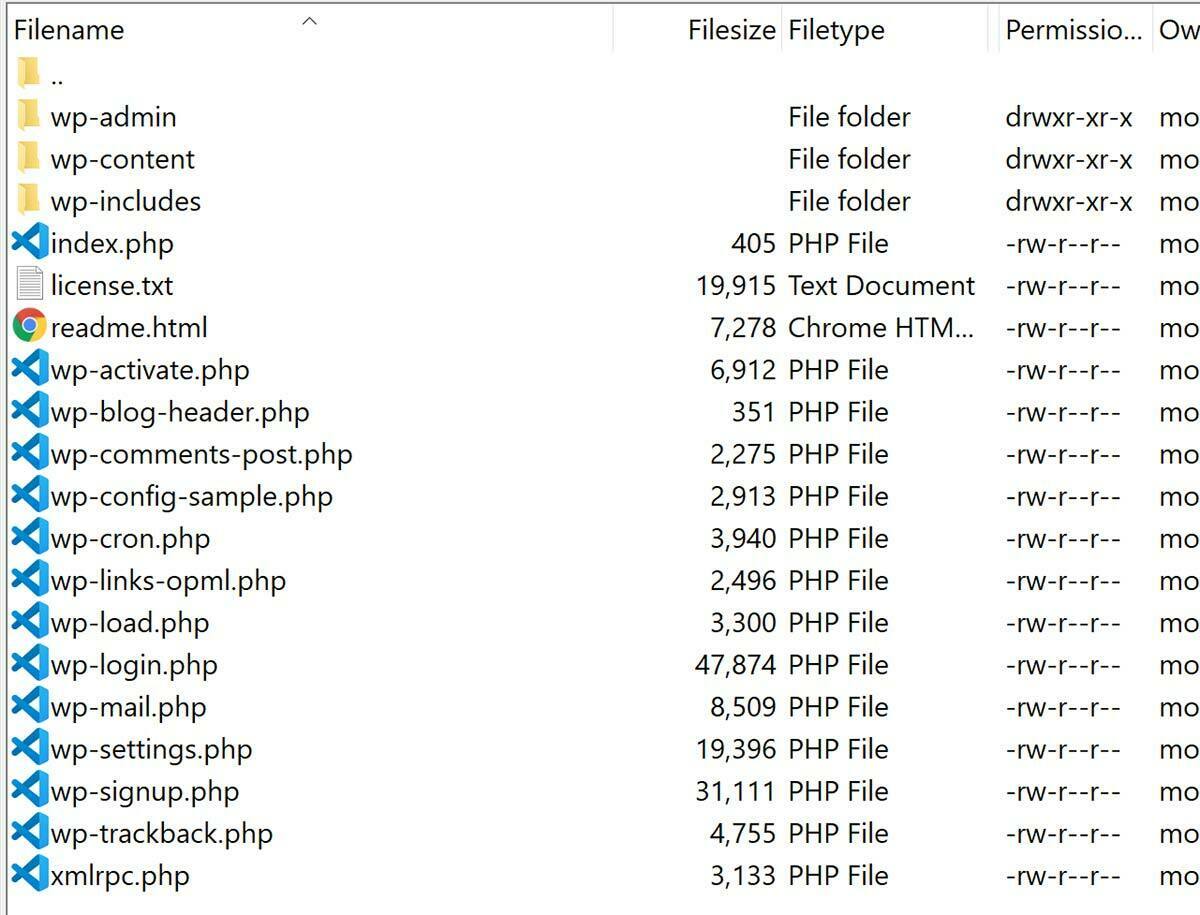
The contents of your WordPress folder will look like this, and we’ll be copying the entire directory over:
Also, check to see if the wp-config.php file is located outside of the main folder where your website is stored – here at vCanopy we store it outside of htdocs for security and other hosts may too – more on this in part 4.
MIGRATING FROM CPANEL OR PLESK
If you’re migrating from cPanel or Plesk, you can export your website quite easily inside your account via the file manager.
Here you can zip all of your WordPress files (see image above), and download them all in just one zip file.
If you’re unsure of how to do this, check out the following articles:
You can now skip to part 3.
MIGRATING WITHOUT A FILE MANAGER
If you have direct access to your servers, you can create a zip file containing all your websites folders/files via the command line – many managed hosts provide direct server access.
To get started, SSH into your server (see your hosting provider’s instructions) and navigate (cd) to your website’s directory. For example, my htdocs folder is the directory I want to zip (for you it may be “public_html”), and for me, this is located in “/var/www/waas.monster” so I’ll run:
cd /var/www/waas.monster
Confirm the folder containing your directory by running to view all the files and directories:
ls -l
My htdocs is indeed here, so now I’m going to zip the directory with the following command:
zip -r mychosenfilename htdocs
Example
zip -r waasmonterbackup htdocs
The above command names zips up everything inside htdocs into a file called waasmonsterbackup.zip (name your zip file whatever makes sense for you).
DOWNLOAD YOUR WEBSITE FILES VIA SFTP
Unfortunately, Filezilla and other FTP clients don’t support compression (to my knowledge), so if you’re using Filezilla or another FTP client and don’t have access to your server to zip everything up, you will need to download them all as is. This may take some time.
Log into your website via SFTP – you’ll need to get the correct details from the current host and either download all of the files inside your website’s folder or the zip file you created.
If you’ve created a zip file, just drag and drop this into your computer.
If you don’t have a zip file, create a folder on your computer to store your website’s files in, and then select all of the files and drag and drop them from your FTP client into your folder.
Once your download has finished, select all of your files except your wp-config.php file and move these into a folder named “htdocs”. If you exported your database via the command line, include this here too.
Next right-click on your new htdocs folder and “Send to” > “Compressed (zipped) folder“.
We’ll now be able unzip htdocs in exactly the right place in part 4.
Part 5. Import Your Database
If your database is less than 512mb in size, you can use PHPMyAdmin to upload it.
If it’s larger, this will require uploading via SFTP and importing via the command line.
IMPORTING VIA PHPMYADMIN
Open up PHPMyAdmin by clicking the database icon next to your website.

Click through to your database as you did in step 2, and then scroll to the bottom and check the “Check all” box. Before we import our database, we need to drop all of the existing tables for this new installation.
Open the dropdown to the right of the checkbox and select “drop“.
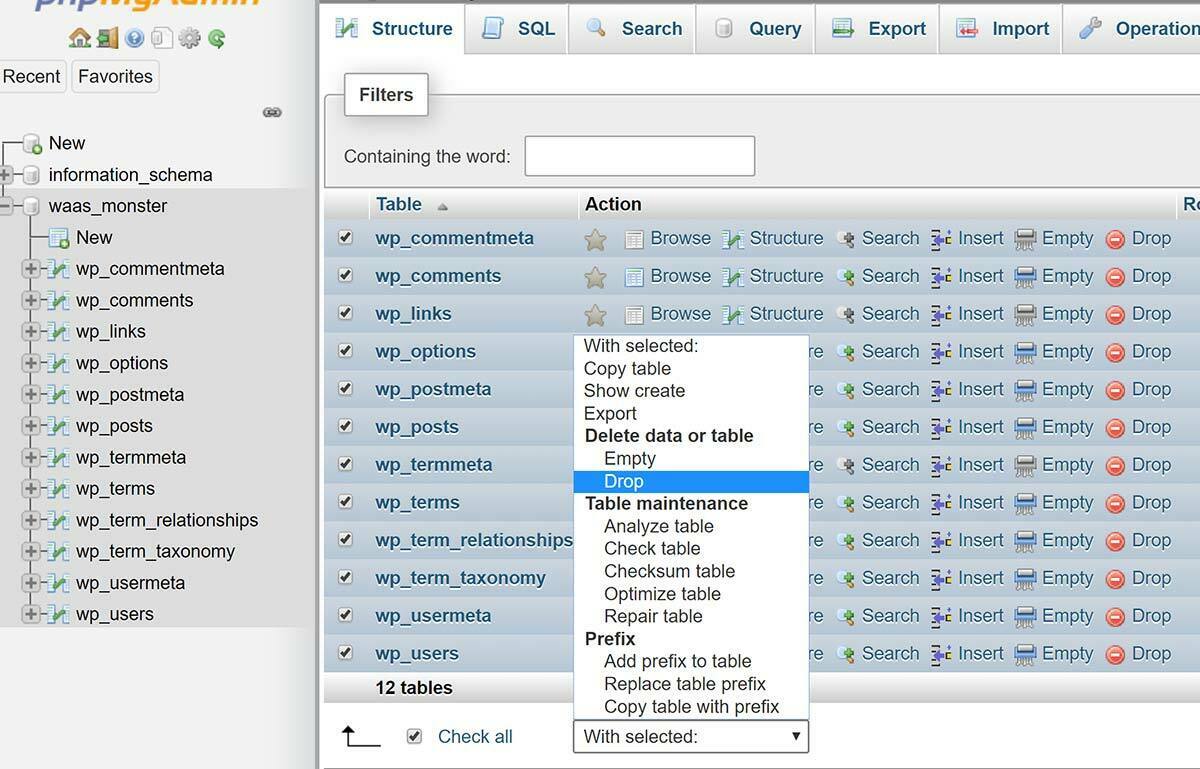
You’ll be asked: “Do you really want to execute the following query?”
Select “Yes” (as this is a brand new WordPress installation there’s no risk here – just make sure you’ve opened the right database!).

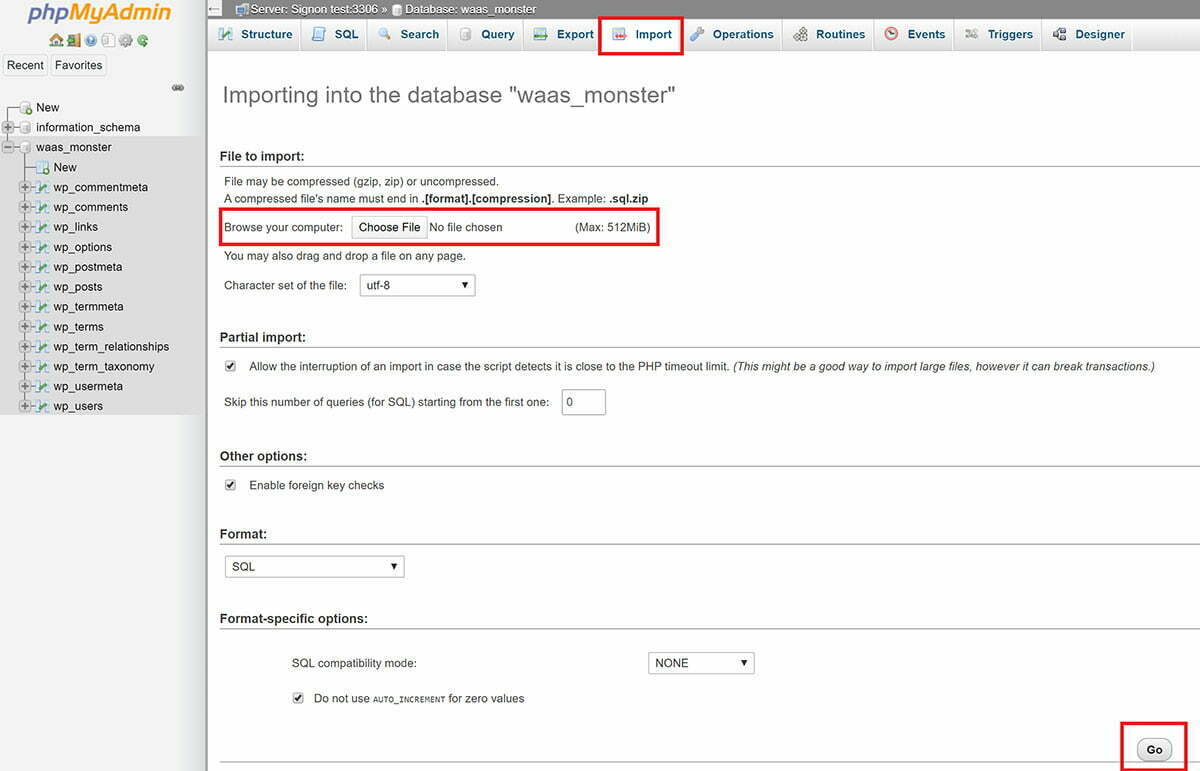
Now we need to import the database. In the menu at the top, click on “Import“.
Click the “Choose file” button and add your database, then scroll to the bottom of the page and click “Go“.
IMPORTING VIA WP-CLI
As we’ve uploaded our database into our website’s /htdocs folder, first run this command to navigate there:
cd /var/www/site.url/htdocs
Now in the folder where our database is located, we can run the following GP-WP-CLI command to import it:
gp wp site.url db import database.sql
IMPORTING VIA MYSQL ON THE COMMAND LINE
This is here primarily for reference purposes, the WP CLI commands above are easier and simpler.
Navigate to your websites:
cd /var/www/waas.monster/
Now we’re in the folder where our database is located we can run the following command to import it:
mysql -u USER_NAME -p DATABASE_NAME < database.sql
We’ll need to switch out “USER_NAME” and “DATABASE_NAME” again. To find these details, open up your website’s configuration modal and click the “Display wp-config” button as shown below:

NOTE: If your database table prefix is not “wp_”, then you will need to edit this in your wp-config.php file.
