 Support Number:
 Lorem ipsum dolor sit amet, consectetur adipiscing elit. Ut elit tellus, luctus nec ullamcorper mattis, pulvinar dapibus leo.
ACTIVATING V2 BACKUPS ON SERVERS PROVISIONED BEFORE NOVEMBER 1ST
To activate backups 2.0 head to your Servers page and click on the name of the server you wish to activate it on.
Warning: This will disable Borg and purge all existing Borg backups from your system. You are responsible for ensuring you have existing backups in place. By enabling Backups v2 you accept full responsibility for this action and confirm you have alternative backups in place. Only enable if you agree to these conditions. Once enabled, this can not be disabled. Borg is going back to the Delta Quadrant.

Introduction
Our new V2 backups system offers multiple significant improvements over our original V1 system. This is part 1 of 3 of our V2 documentation, and in this article, we’ll look at how you can configure and manage your backups using the new V2 system, and answer all of the common questions we’re asked about how things work and where things are stored.
In part 2 we’ll look at how to get started with local backups, and in part 3 we’ll look at setting up your remote backups.
TABLE OF CONTENTS
- How vCanopy backups work
- Where local backups are stored
- Local backups storage threshold
- Backup retention time and adjusting the pruning schedule
- Purging backups
- Exporting backups for SFTP download
- Restoring exported backups
- Setting the daily pruning time
- Setting backup concurrency
V2 backups run on a custom implementation of the exceptional Duplicacy, a cross-platform cloud backup solution. On its own, without any of the configurations our team has created for its WordPress implementation and integration into vCanopy, the software would cost you $50/year per server.
Improvements over the older V1 system that runs on Borg include: –
- Lock-Free Deduplication (which has numerous benefits).
- Remote backups to 4 different external providers: AWS S3, Backblaze B2, Dropbox, and Wasabi.
- Significant performance improvement.
- Exporting previous, existing backups for download over SFTP.
We’ll dig into this and more below. To jump straight into setting up V2 backups for your websites, please see the following 2 articles for local and remote backups:
- V2 Backups Part 2. Setting Up Local Website Backups
- V2 Backups Part 3. Setting Up Remote Website Backups
How vCanopy Backups Work
Both our V1 and V2 backup systems use incremental backups. This means that each time your websites are backed up, the data is de-duplicated and compressed. After the first initial full backup, each backup builds upon the previous data.
Duplicacy uses deduplication, which stores chunks to your local server and/or cloud storage using content hashes as file names. During backup creation, it compares them to existing chunks and shares identical chunks between backups.
When a backup is to be restored, the system collects all the data chunks relevant to that specific backup and reconstitutes it.
A common question we get asked is “where is my site backup stored?” with the expectation that they will be accessible in a zip file somewhere on the server. As backups are all stored as chunks, this format that is non-human readable and so they don’t exist in the same way that a plugin backup, for example, would exist on your server.
DUPLICACY CHUNKS
With Duplicacy:
- Chunks are each saved to their own individual file with their own hash which functions as the file name.
- Chunks require no further modification once saved (and thus data corruption is far less likely to occur due to their immutability).
- Chunks of data that are the same across multiple websites only need to be stored once.
DUPLICACY LOCK-FREE DEDUPLICATION
Duplicacy also uses what’s called “Lock-Free Deduplication”, which means it doesn’t require a centralized indexing database for keeping track of backup data. Instead, it performs a much simpler file lookup by using file names derived from the hash of each chunk. This method does not require a distributed locking mechanism on top of the file storage.
Lock-Free Deduplication both reduces code complexity and makes deduplication less prone to errors, and Duplicacy has been shown to offer significant performance improvement for backups over other well-known backup tools in independent benchmarking (1), (2).
In a nutshell, what all this means is that Duplicacy is an extremely efficient, reliable, and customizable backup solution, and vCanopy’s implementation makes it one of the most comprehensive WordPress backup systems available.
WHY USE INCREMENTAL BACKUPS?
Incremental backups are less resource-intensive, and they require significantly less disk space than full, individual website backups.
Taking full website backups of a site every hour as a separate archive, even if it was compressed, would use so much space that it wouldn’t be suitable locally, even for small websites. For large websites, you may only be able to take 1 or 2 backups before the server no longer has space to create a third.
By backing up incrementally, after your first initial backup which copies your entire website, all future backups are much, much smaller, only taking into account the changes. This allows you to take [potentially] hundreds of backups while saving you a tremendous amount of disk space.
Where Local Backups are Stored
Our backups system stores backup data and data related to backups in multiple places on your server. Below details each of these locations and what they store.
1. THE BACKUP STORAGE LOCATION ON THE SERVER
Local backups are stored in /opt/vCanopy/backups/duplications, which, as mentioned in the previous section, has a structure that isn’t human-readable. Here you will not see individual backups of your websites, or your WordPress files or database.
2. THE BACKUP CACHE FOLDER
Located inside your websites htdocs directory is a cache for your website’s previous changes. This cache helps speed up the backup process so the system can easily see and check only the changed files and backs up these changes.
3. SFTP EXPORTS
When you click on the export backup button in the UI (or run the GP-CLI manually), the backup program reconstitutes the backup you’ve specified and stores it in the /root directory on your server for 4 hours. You can download it over SFTP during this time, and then automatically removes it after 4 hours have passed.
Local Backups Storage Threshold
This is the threshold of the available free disk space required in order for a scheduled backup to proceed. If the available disk space on your server less than this amount, your website backups will be paused.
You can adjust the threshold % to tell the server when backups should pause, based on available free storage space. Backups will automatically resume when space becomes available again.
For example, if the threshold is set to 10% as pictured below, backups will cease to run when the available disk space on your server is less than 10%.

Backup Retention Time and Adjusting the Pruning Schedule
Here you can configure what type of schedule backups should take place on, and how long they should last – effectively setting how many copies of a backup to keep.
HOW DUPLICACY PRUNING WORKS
Duplicacy has unit granularity of a day with regards to its prune keep command arguments.
Take this pruning schedule as an example:
-keep 0:360 -keep 30:30 -keep 7:7 -keep 1:1
This translates to:
- Keep Zero revisions older than 360 days
- Keep a revision every 30 days for revisions older than 30 days
- Keep a revision every 7 days for revisions older than 7 days
- Keep a revision a day for revisions older than a day.
Which means a daily revision for a week, a weekly revision for a month, a monthly revision for a year, nothing older than a year.
HOURLY PRUNING
For hourly backup schedules, pruning works a little differently.
Duplicacy only has granularity down to a day and it doesn’t understand that there are 24 hours in a day. It is measuring days based on the system time and pruning backups based on days as unit. So as soon as the clock strikes midnight, it is the next day, and when the next pruning runs it detects all backups that occurred before the strike of midnight as “older than a day”.
To handle this, we now use:
-keep 1:2
This means that we keep a revision every day for revisions older than 2 days, this will mean that the hourly/daily revisions are still being created, but they will only be pruned when older than 2 days per the clock time. The side effect of this will mean that if you are running hourly backups then depending on what time you have your prune’s schedule to run you could have up to 2 days of hourly backups before they are pruned back to daily.
Most users have their pruning schedule set to the early hours of the morning, so they will likely see around 25-30 hourly backups being available.
SETTING YOUR SCHEDULE
Inside the UI within the backups Purge tab, you can set the retention time for both local and remote backups in the dropdowns by defining when the system should prune (delete/remove) them:

Here you can configure what type of schedule backups should take place on, and how long they should last: –
- Daily backups: At least 1 backup everyday.
- Daily backups for a week and then weekly backups: At least 1 backup per week after the first 7 days
- Daily backups for a month and monthly backups: Backups every day for 30 days, then 1 backup for every month prior.
- Daily backups for a week, weekly backups for a month, and monthly backups: Exactly as described.
Hourly: As noted earlier, hourly backups will be available for between 1-2 days depending on the daily pruning time. There will be at least 24.

You can then set how long the maximum time backups can be kept for: 60, 90, 180, 360 days, or keep all backups as per the schedule indefinitely.
Choose your desired settings and click Update.
Purging Backups Manually
If you would like to purge backups manually to free up disk space, you can do this within your website customizer in the Backups Purge tab.

INDIVIDUAL BACKUPS
For individual backups, simply select the specific backup you want to delete and from the dropdowns, and then hit the Purge button.
The system will then delete that specific backup from your server or remote storage.
MASS PURGING BACKUPS
You can mass purge backups within the UI or via GP-CLI – whichever method you prefer.
If purging from the UI you simply need to select the data range from the UI and click the Purge button.
If using GP-CLI, the same applies, and you need to use specific date ranges. The syntax for purging from the command line is as follows:
gpbup <site.url> -purge {local/aws-s3/backblaze/wasabi/dropbox} "<date.string.from>" "<date.string.to>"For Example:
gpbup examplewebsite.com -purge local "2021-04-28 09:00" "2021-04-29 01:00"
The date string is the literal string shown inside the UI in the dropdown, and the quotations around the date string are required.
Exporting Backups for SFTP Download
You can export any of your websites backups for download over SFTP. If you need a current backup, you simply need to take a manual backup and select it from the dropdown. If you want a copy of your site from a month ago (assuming you have backups from that time), you can download that too.
You can also choose from your local backups, your remote provider backups, and even local backups from another server. Whichever backup you need, you can download it with V2.
You’ll find the available options inside the backups Export tab:

SFTP DOWNLOAD FROM THIS SOURCE
Here you’ll find the backups that have been taken for your website on this server. This includes the remote backups that have been taken of this site on this server.

SFTP DOWNLOAD FROM AN ALTERNATIVE SOURCE
Click the Fetch All Potential Sources button to check for available backups from other sources.

If they exist, you will be able to select them from the dropdowns. These backups include those that exist for the same domain on a different server and remote backups that have been taken for the same domain but NOT hosted on this server.

DOWNLOADING YOUR BACKUP
To download your exported backup, you can connect to your server over SFTP:
- Connect to a vCanopy Server by SFTP as System User
- Connect to a vCanopy Server by SFTP as the Root user
Your backup will be available for download in the /root directory:
/root/site.url-remote-SFTP-export.tar.gz
BACKUP EXPIRATION TIME
The backup you export will be available for download for the next 4 hours. After that, the server will automatically remove it.
Restoring Exported (SFTP) Backups
NOTE: For restoring regular local or remote backups, please see parts 2 and 3 of this series where we detail how to set them up and configure them.
To restore a backup that you originally exported via SFTP, you can do this by first uploading to a directory called restores in /var/www/site.url.
To create this directory, run the following command (switching out site.url with your website URL):
mkdir /var/www/site.url/restores
This location is also detailed inside the backups tab as well:
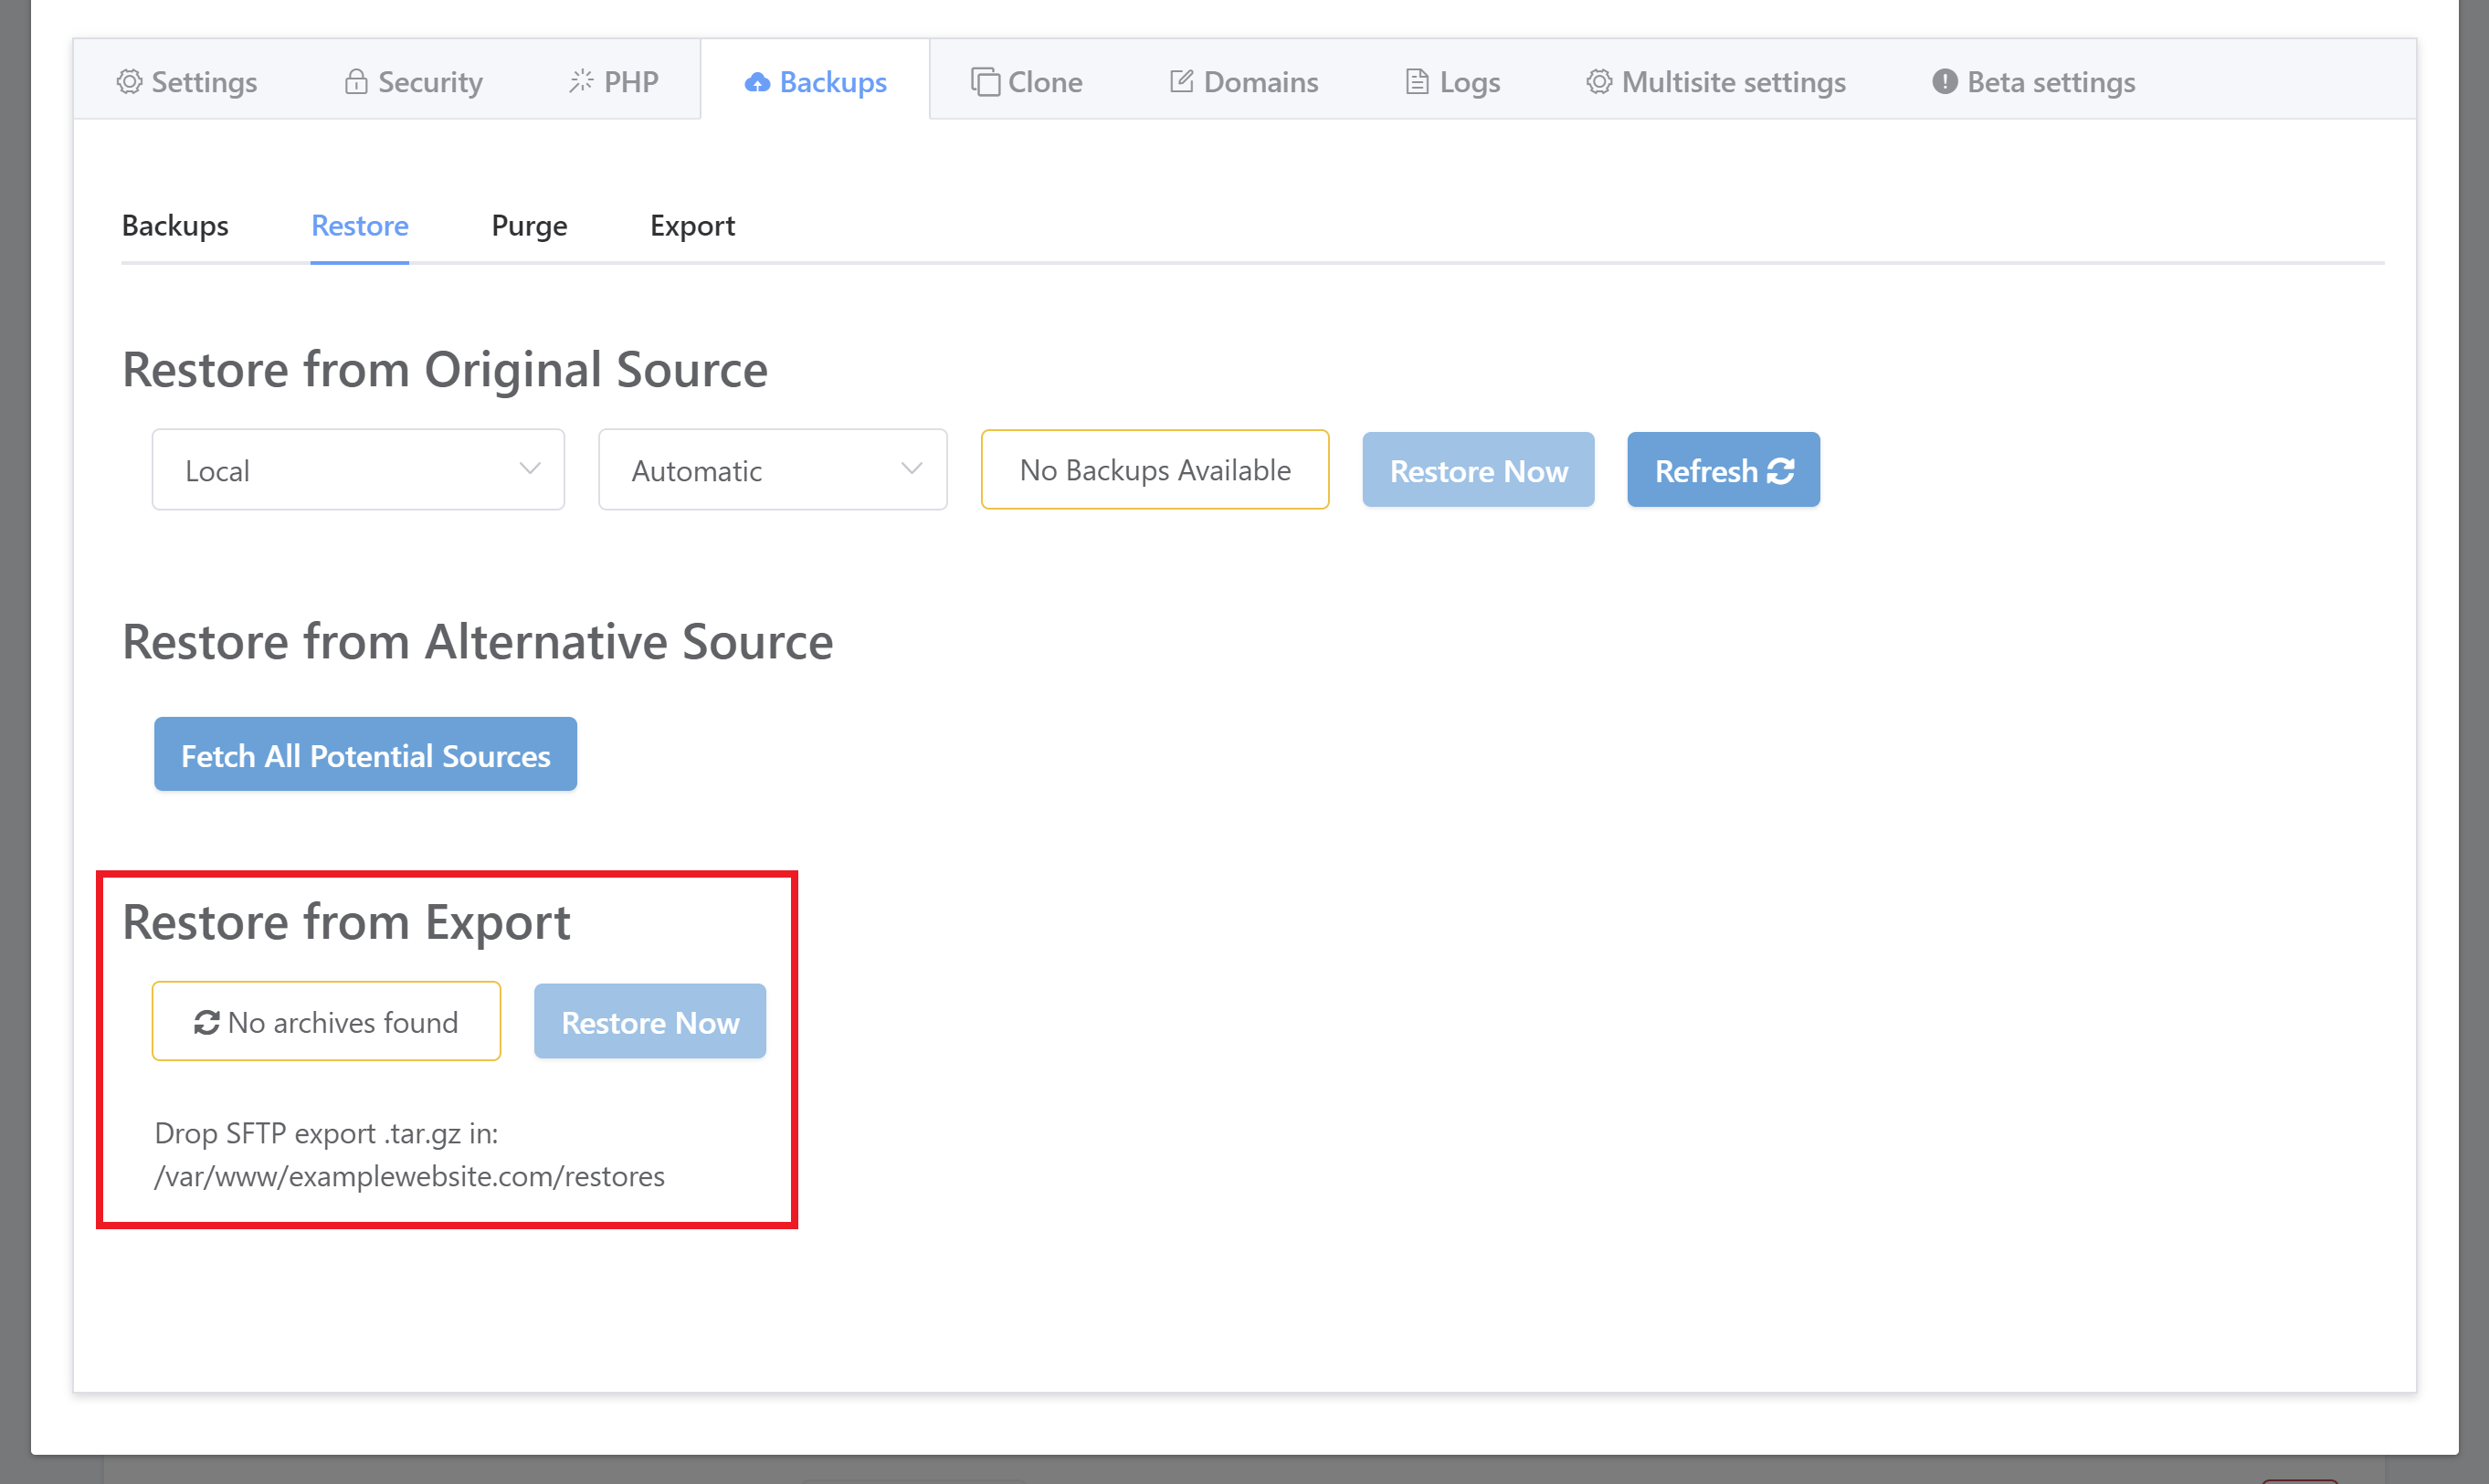
The backup file needs to by .tar.gz format.
Once uploaded, click “No Archives Found” to check for your upload. Then select your backup and hit the Restore Now button.
Setting the Daily Pruning Time
The time that the server automatically purges backups as per your schedule can be set inside your Server customizer. Head to your Servers page inside your vCanopy account and click on the name of the server you wish to configure to open up the customizer.
In the backups tab, you can set the time you would like the daily prune to take place:

NOTE: Make sure this is not the same time that you set the automatic reboot time inside the Settings tab.
Prune jobs run every 24 hours.
Setting Backup Concurrency
Backup concurrency lets you set how many backups can simultaneously run at the same time. For example, if you set the concurrency to 3, you’re letting the server attempt to take backups of 3 different websites at the same time (if the backup times you’ve set overlap). Backups that overlap will be queued and take place once the current backup/s have completed.
As in the section above, this can also be set inside your Server customizer. Head to your Servers page inside your vCanopy account and click on the name of the server you wish to configure to open up the customizer.
In the backups tab you can set how many backups can take place simultaneously:

Select your desired number and click the Update button.
IMPORTANT
The number you set here should not exceed the number of CPU cores that you have on your server. If you only have 1 CPU, make sure the concurrency is set to 1. For servers with 1-2 cores, you may find leaving this setting to 1 is the best option for you.
Further Reading
For further information about how backup systems work, the available options for configuring them, and for setting up remote backups (available on V2), please see the articles listed below.
STRATEGY
V2 BACKUPS
- V2 Backups Part 1. How Backups Work / Management / Purging / Exports and Imports
- V2 Backups Part 2. Setting Up Local Website Backups
- V2 Backups Part 3. Setting Up Remote Website Backups