


IMPORTANT
Do NOT copy custom 6G WAF rules over to the 7G WAF. While crafting rules is similar for both, they are not directly compatible, and the same rules may not even be necessary. Copying 6G rules over to 7G specific configs will cause an Nginx syntax failure and prevent it from being able to restart, potentially taking Nginx (and all your websites) offline.
Introduction
The vCanopy Stack incorporates both the 6G and 7G Web Application Firewalls. The 7G WAF was originally developed by Jeff Starr at Perishable Press for Apache-based servers. We have adapted it for Nginx, modularised it to allow for granular per site and per rule block control, per rule whitelisting, and added logging, but none of this could be done without Jeff’s original incredible work.
7G is an excellent lightweight firewall that builds upon its predecessors in Jeff’s nG series of work over the years. It is the most recent iteration and was officially released out of beta on September 7th, 2020.
It works by parsing requests for anything anomalous or malicious looking, based on a collection of rules for: –
- Bad Bots
- Bad Methods (disallowed HTTP request methods)
- Bad Query Strings
- Bad Referrers
- Bad Requests
These work to protect your websites against: –
- Directory Traversal
- HTTP Response Splitting
- (XSS) Cross-Site Scripting
- Cache Poisoning
- Dual-Header Exploits
- SQL/PHP/Code Injection
- File Injection/Inclusion
- Null Byte Injection
- WordPress exploits such as revslider, timthumb, fckeditor, et al
- Exploits such as c99shell, phpshell, remoteview, site copier, et al
- PHP information leakage
Additionally, the 7G Firewall protects against a wide range of malicious requests, bad bots, spam, and other nonsense – quoted directly from Perishable Press, see the full article here.
HOW IT DIFFERS TO THE 6G WAF
7G is both an upgrade to the existing rulesets, making it more secure than the 6G WAF, and there is now also an include for mapping. This means that instead of outright disabling a rule when/if it causes you problems, you can actually disable it, modify it for your specific use case, and then add your edited version of that rule back in. This allows you to work around the issue without losing all the benefits of keeping that firewall rule active.
The 7G Firewall Configuration Location on Nginx
The 7G firewalls configuration file is called: 7g-mappings.conf.
This file is used by all of your websites on your Nginx servers to run the 7G firewall when activated.
You can view the 7G configuration files contents with:
cat /etc/nginx/common/7g-mappings.conf
We can see that each different ruleset, and that the rules within each ruleset are all numbered, 1 rule per line. It’s worth taking a good look at this file to get a handle on what all the rulesets do.
Part 1. Enable the Firewall
STEP 1. PROVISION A SERVER AND DEPLOY A vCanopy SITE
We have documentation on provisioning up and managing servers here:
And documentation about deploying and managing vCanopy sites here:
STEP 2. ENABLE/DISABLE THE vCanopy 7G WAF
Head over to the Sites page of your vCanopy account, and click on the name of your website to open up the website configuration modal:
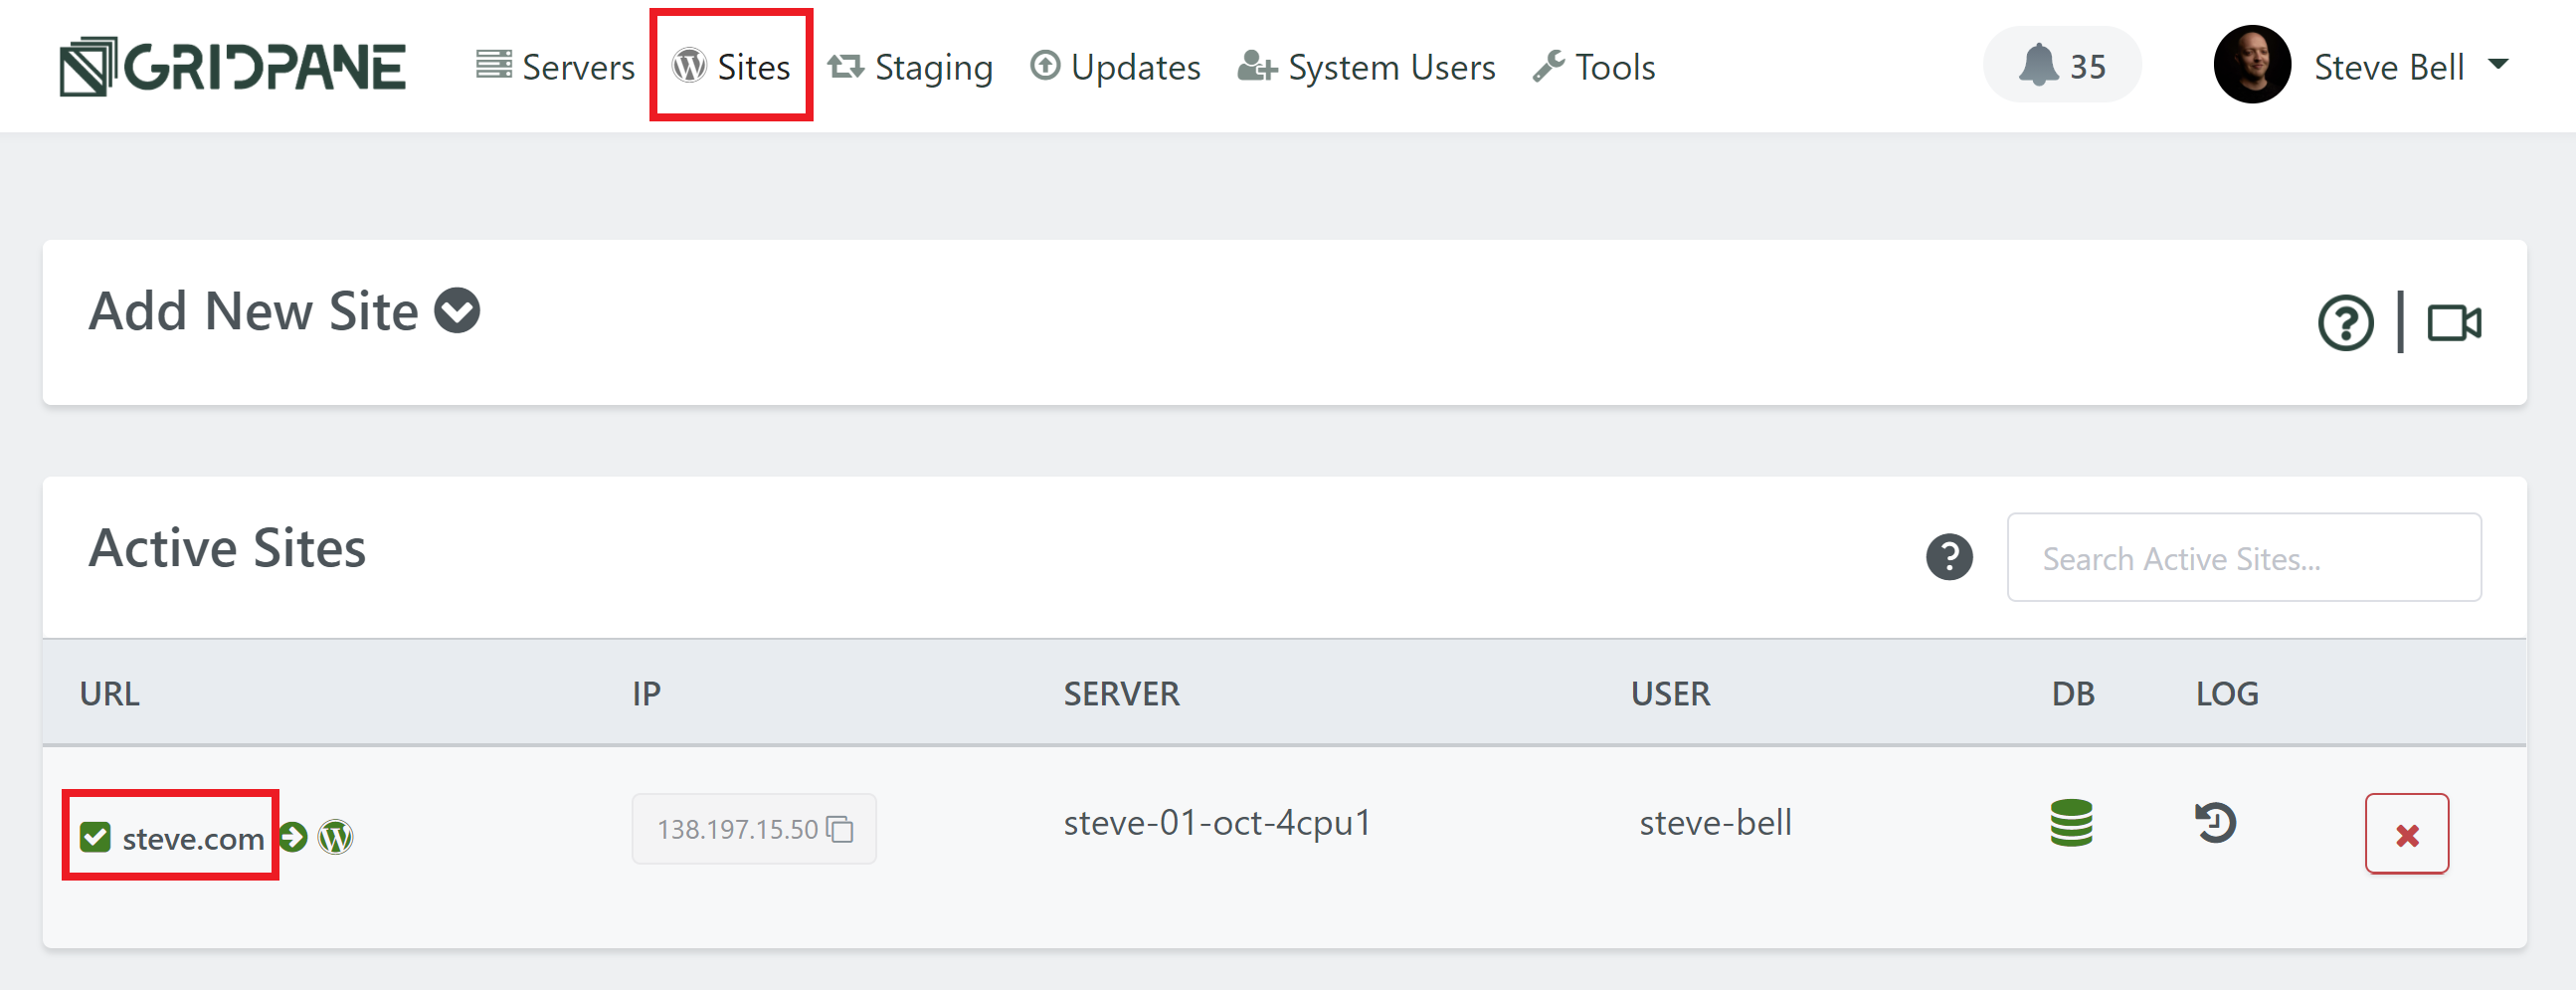
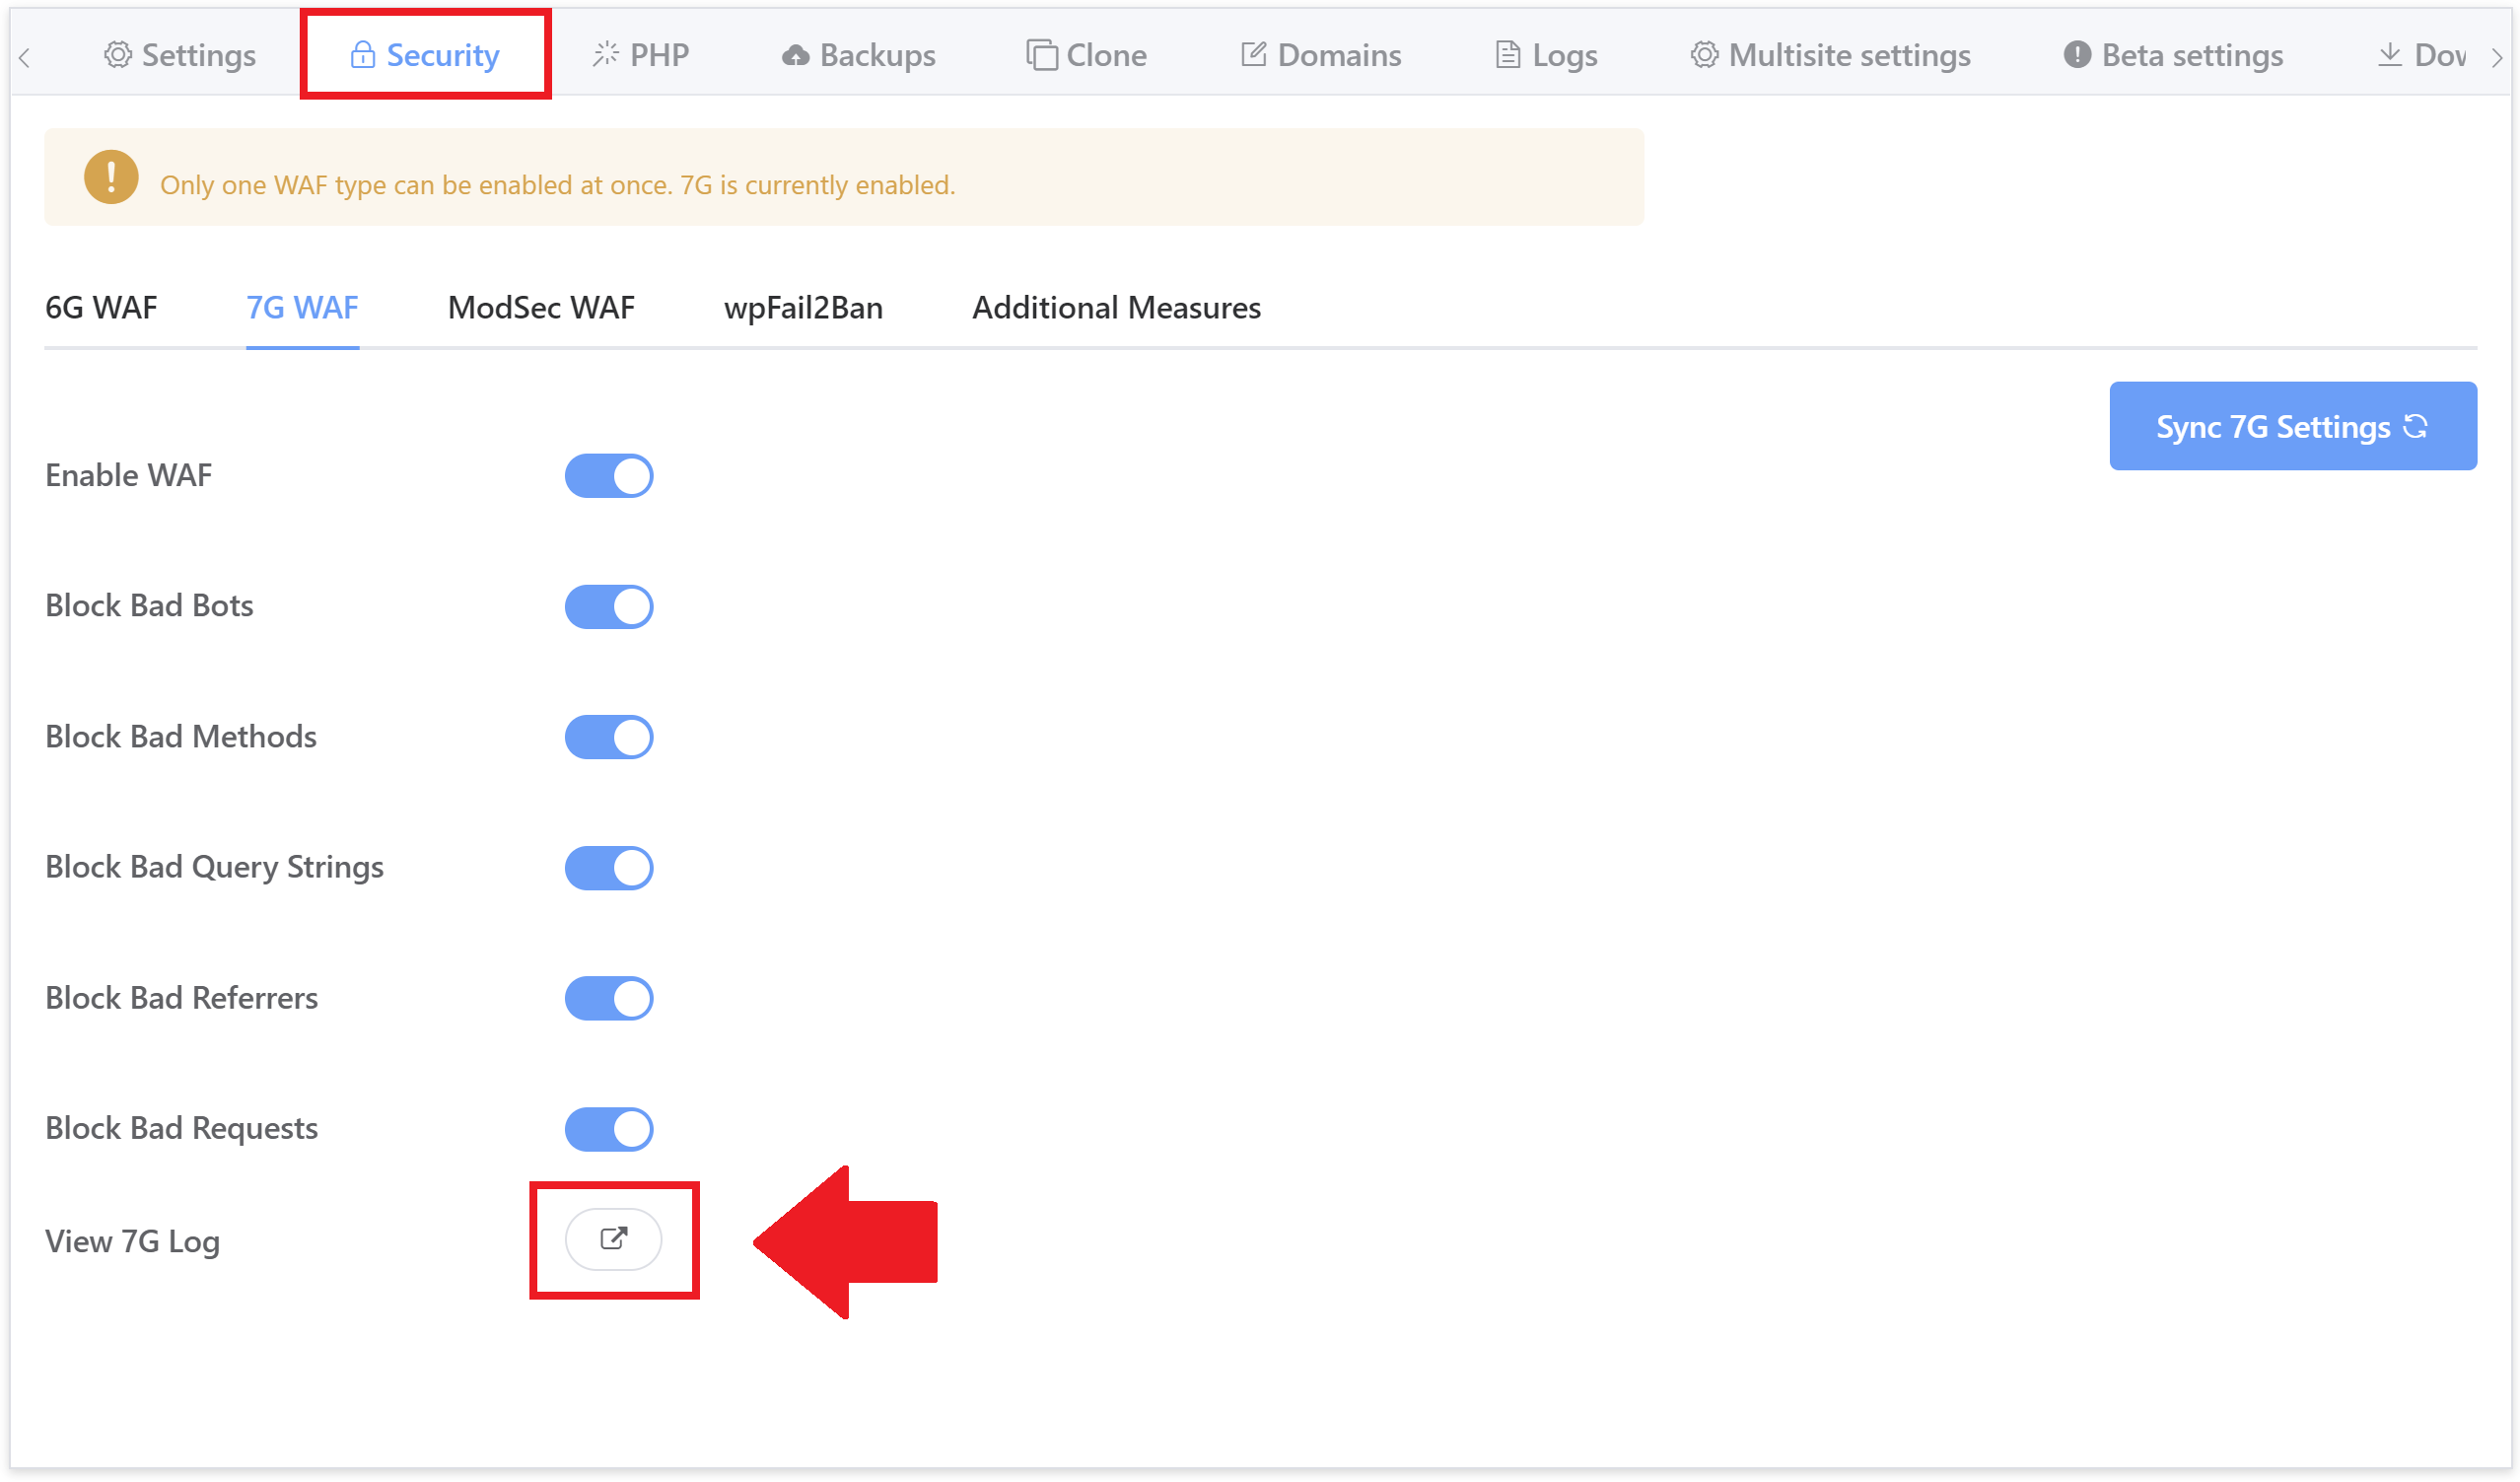
Click through to the security tab and you’ll several different options for securing your websites. Select the 7G firewall and toggle on the Enable WAF option:

Enabling the WAF will automatically enable all of it’s rulesets so that you won’t need to do so one by one.
Part 2. The 7G WAF Logs
We have enabled logging of all blocked requests with information regarding which ruleset and specific rule has blocked the request. The log is now available to view directly inside your vCanopy account inside the security tab here:
It can be also viewed by SSH/SFTP as root user here:
/var/www/{site.url}/logs/7g.logOr accessed by SFTP as a system user here:
/Sites/{site.url}/logs/7g.logThe log provides useful information about the request that can be used to analyze whether a whitelist or exclusion needs crafting and to tune the firewall to ensure false positives are handled correctly.
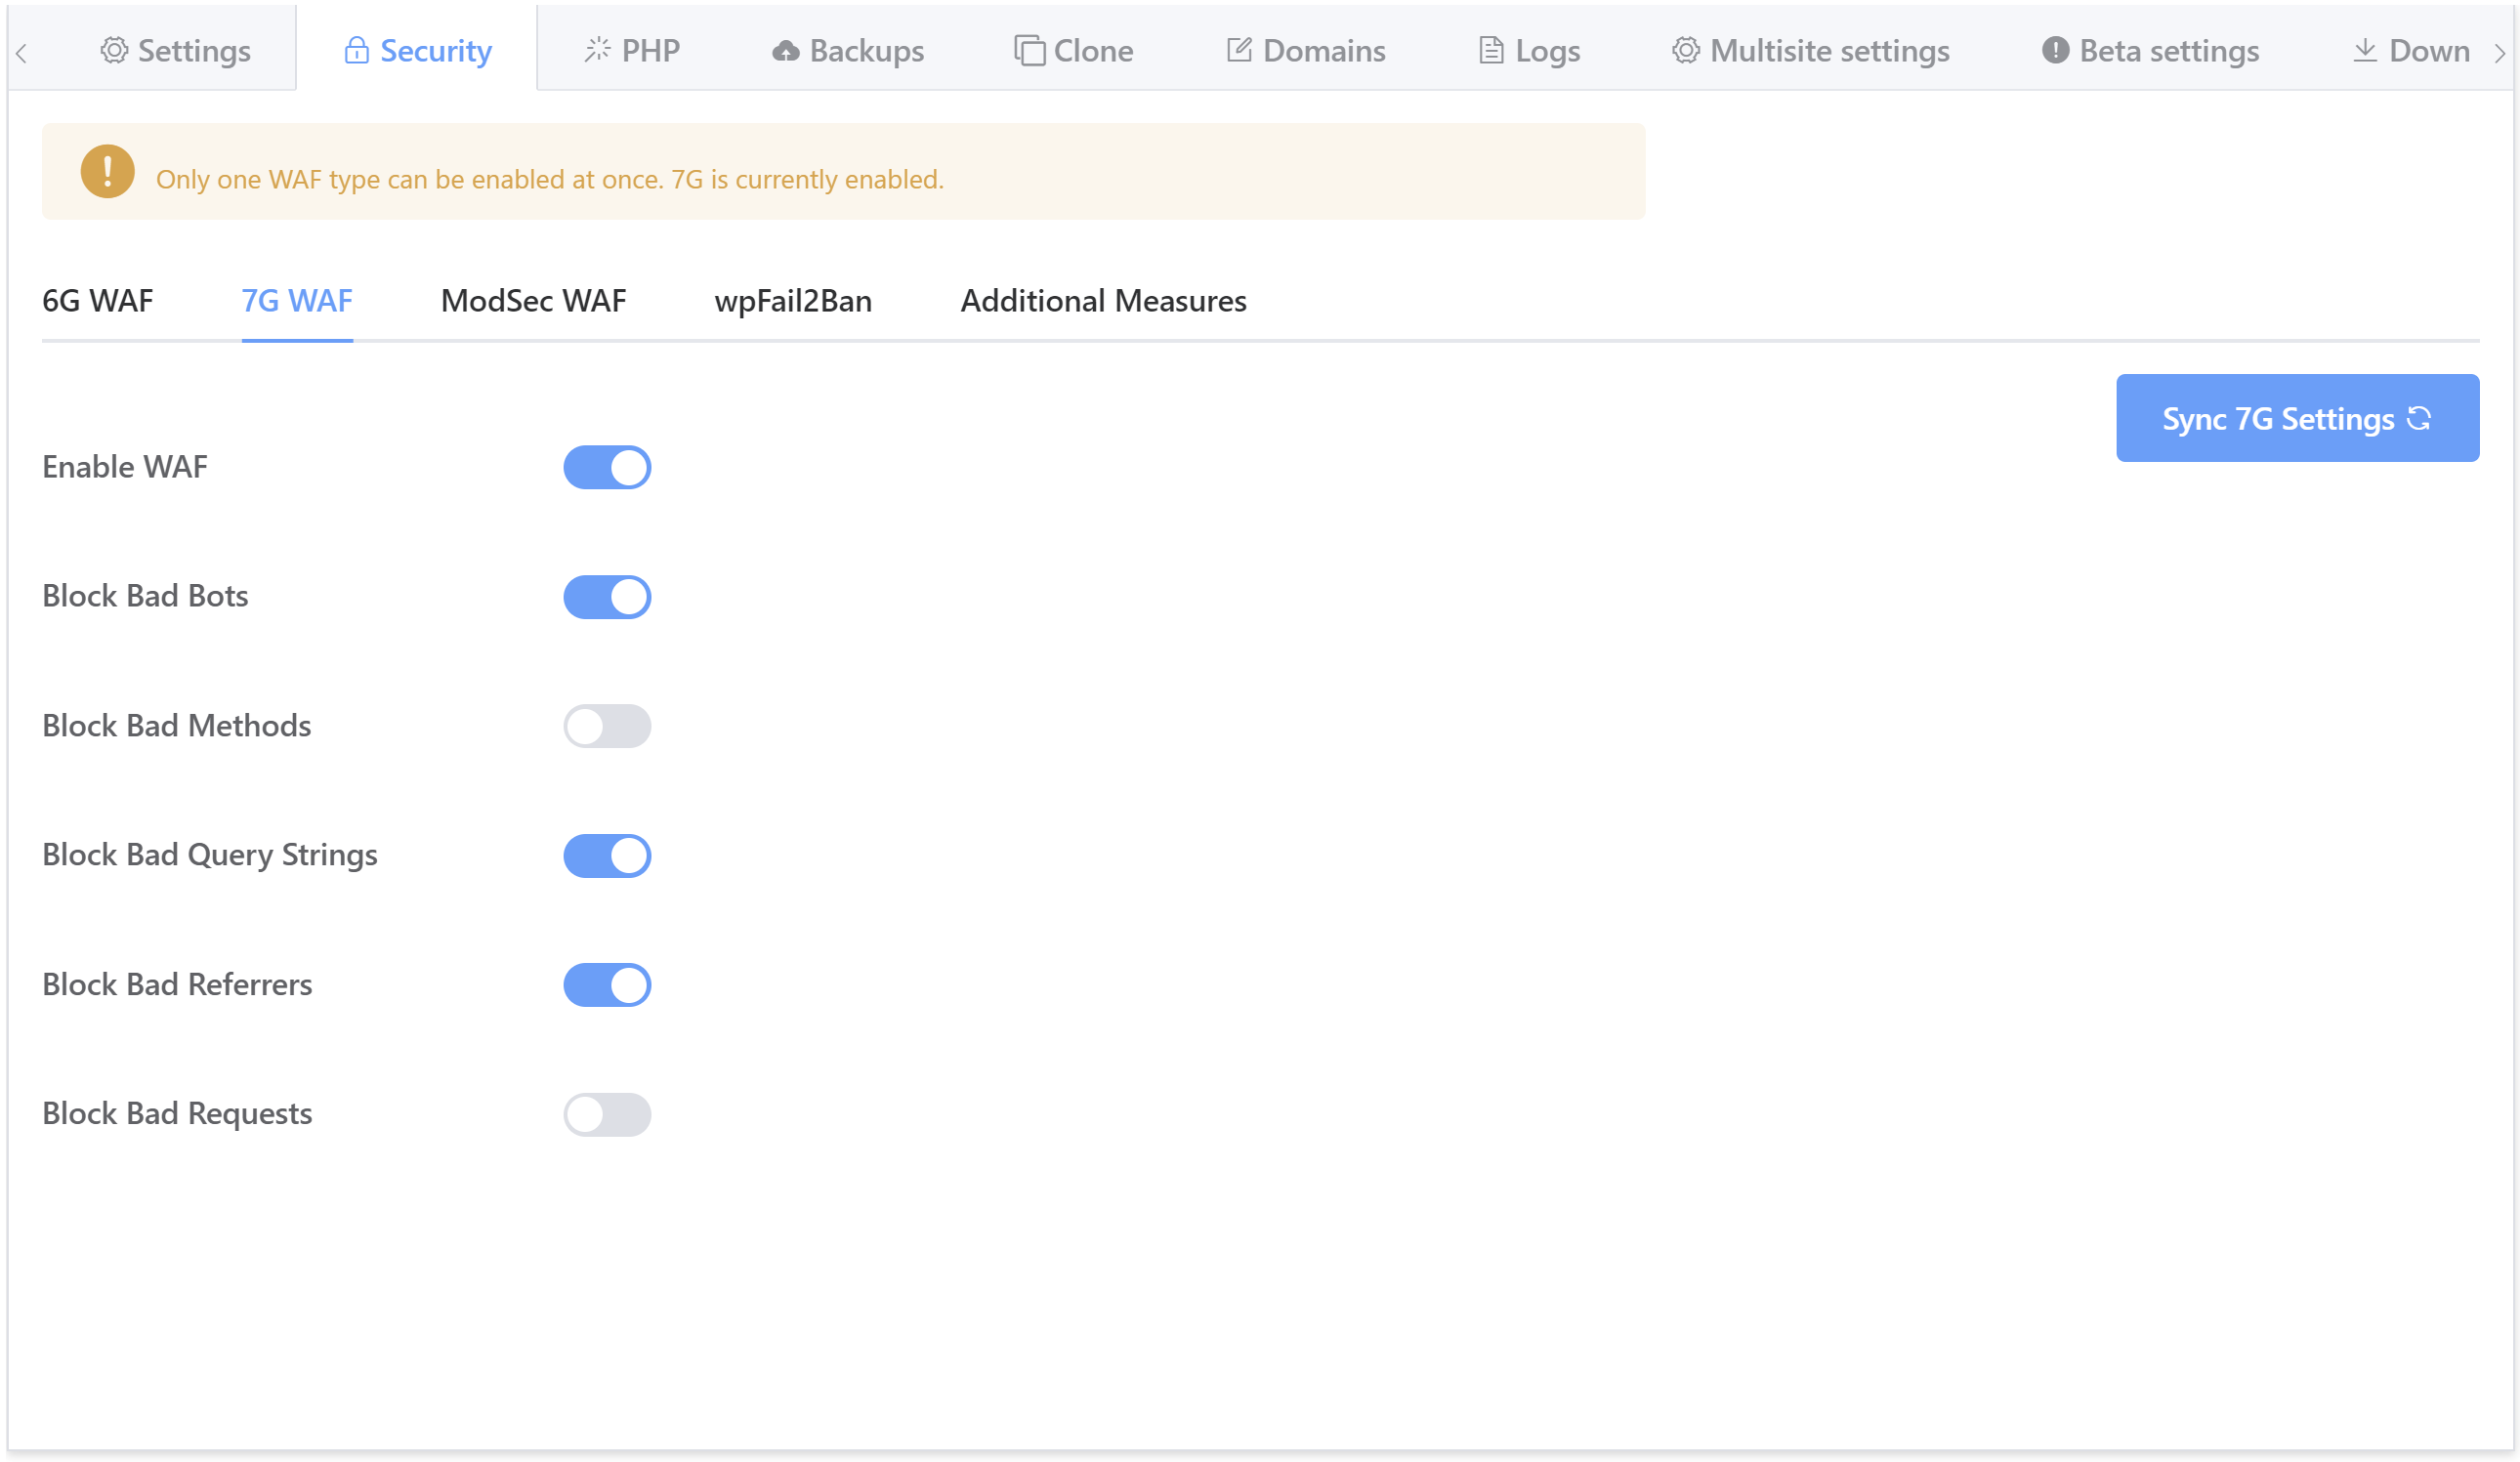
Part 3. Enable/Disable 7G WAF Rulesets
The vCanopy version of the 7G WAF has been modularised so that each block of rulesets can be enabled and/or disabled individually.
This can be done either directly inside the website configuration modal, or via GP-CLI by logging in to your server by SSH as root user.
As mentioned earlier, by default when you enable the vCanopy 7G firewall for the first time all rulesets will be active.
From inside the security tab, simply toggle rulesets on and off as needed, for example:
The GP-CLI commands to enable/disable each ruleset are as follows (replace {site.url} with your site primary domain):
Bad Bots
gp site {site.url} 7g -bad-bots on
gp site {site.url} 7g -bad-bots off
For example:
gp site vCanopy.com 7g -bad-bots off
Bad Query Strings
gp site {site.url} 7g -bad-query-string on
gp site {site.url} 7g -bad-query-string off
For example:
gp site vCanopy.com 7g -bad-query-string off
Bad Referrers
gp site {site.url} 7g -bad-referer on
gp site {site.url} 7g -bad-referer off
For example:
gp site vCanopy.com 7g -bad-referer off
Bad Requests
gp site {site.url} 7g -bad-request on
gp site {site.url} 7g -bad-request off
For example:
gp site vCanopy.com 7g -bad-request off
Bad Methods
gp site {site.url} 7g -bad-methods on
gp site {site.url} 7g -bad-methods off
For example:
gp site vCanopy.com 7g -bad-methods off
Part 4. 7G WAF Whitelist Rules
We can use the information provided by the 7G log (see part 2 above) to create WAF rules to whitelist any false positives that we may get or to ensure that requests we know to be safe bypass the firewall.
Each site’s individual 7G configuration file can be found here:
/etc/nginx/common/{site.url}-7g.confFor example:
/etc/nginx/common/vCanopy.com-7g.conf
When a request breaches a rule it changes one of the following Nginx variable state from 0 to 1:
$7g_drop_bad_bot$7g_drop_bad_referer$7g_drop_bad_query_string$7g_drop_bad_request$$7g_drop_bad_method
The state of this variable triggers the dropping or pass-through of the request being processed.
Within that configuration file there are also two includes, with the 7G WAF both the server-wide and site-specific includes are set to match a wildcard pattern:
include /etc/nginx/extra.d/*7g-context.conf;
include /var/www/{site.url}/nginx/*-7g-context.conf;
The eagle-eyed among you will notice the wildcard patterns differ slightly. The server wide wildcard pattern does not include a hyphen:
*7g-context.conf;
But the site specific include does:
*-7g-context.conf;
Apologies for this inconsistency, but it is required to allow backwards compatibility for pre-existing serverwide whitelist files, but should not affect your file naming conventions.
Create a server-wide whitelist
If we want a whitelist to only be active server-wide, then we will create a file to match the server-wide wildcard inclusion. An example of such a server-wide whitelist file would be:
/etc/nginx/extra.d/whitelists-7g-context.conf
Create a site-specific whitelist
If we want a whitelist to only be active on a specific site, then we will use the site wildcard. An example of such a site-specific whitelist file would be:
/var/www/vCanopy.com/nginx/whitelists-7g-context.conf
Crafting an exclusion is quite simple. Let’s look at some examples below.
NOTE
It's always a good idea to name your configs so that it's easy to identify them. The *-7g-context.conf include means that you can replace the * with any name of your choosing. Choose one that makes sense so that if you need to find/edit again in the future, or need help from support, it's easy to identify.
EXAMPLE 1. WHITELIST AN IP AGAINST ALL RULES
Sometimes an external service may be flagged by a firewall. If, for example, your connected to a service using the following IP 199.191.137.17 to connect to and manage your WordPress site, you could create an exclusion as follows:
First, SSH into your server and create your config with the following command (switching out site.url with your domain name):
nano /var/www/site.url/nginx/ip-whitelist-7g-context.conf
Add the following rules to the file:
if ($remote_addr = "199.191.137.17") {
    set $7g_drop_bad_request 0;
    set $7g_drop_bad_referer 0;
    set $7g_drop_bad_query_string 0;
    set $7g_drop_bad_method 0;
    set $7g_drop_bad_bot 0;
}
Hit CTRL+O and then Enter to save the file. Exit nano with CTRL+X.
Check and reload Nginx
To set your rule into effect you will need to check your Nginx syntax with:
nginx -t
If no errors are present, reload Nginx with:
gp ngx reload
Your rule is now active.
EXAMPLE 2. WHITELIST A GROUP OF IPS AGAINST ALL RULES
SSH into your server and create your config with the following command (switching out site.url with your domain name):
nano /var/www/site.url/nginx/ip-whitelist-7g-context.conf
To whitelist a group of IPs, add the following sample rule to the file:
if ($remote_addr ~* "(199.191.137.17|XX.XX.XX.XX|XX.XX.XX.XX)") {
	set $7g_drop_bad_request 0;
	set $7g_drop_bad_referer 0;
	set $7g_drop_bad_query_string 0;
	set $7g_drop_not_allowed_method 0;
	set $7g_drop_bad_bot 0;
}
Replace 199.191.137.17 and XX.XX.XX.XX with your desired IPs you want to whitelist.
Hit CTRL+O and then Enter to save the file. Exit nano with CTRL+X.
Check and reload Nginx
To set your rule into effect you will need to check your Nginx syntax with:
nginx -t
If no errors are present, reload Nginx with:
gp ngx reload
Your rule is now active.
EXAMPLE 3. WHITELIST AN IP AGAINST A SINGLE RULE OF A RULESET
Let us assume you want to open up your firewall to PUT requests from an IP 199.199.199.199. The bad methods ruleset blocks the following methods:
- Connect (rule 1)
- Debug (rule 2)
- Delete (rule 3)
- Move (rule 4)
- Patch (rule 5)
- Put (rule 6)
- Trace (rule 7)
- Track (rule 8)
When your external resource tries to connect you will get a log error similar to the following
[07/Oct/2020:06:18:35 +0000] [":not_allowed_method_6:"] 199.199.199.199 yourwebsite.com "PUT /wp-content/plugins/awesome-plugin/plugin.php HTTP/2.0" 405 "-" "Mozilla/5.0 (Macintosh; Intel Mac OS X 10.15; rv:73.0) Gecko/20100101 Firefox/73.0"
We can see the request from IP 199.199.199.199 has breached the bad_methods ruleset, rule 6.
To whitelist this IP for this specific rule, create a config with the following command (switching out site.url with your domain name):
nano /var/www/site.url/nginx/PUT-whitelist-7g-context.conf
Add the following to the file:
set $exclusion_rule_match "";
if ($remote_addr = "199.199.199.199") {
    set $exclusion_rule_match 6;
}
if ($not_allowed_method_7g = $exclusion_rule_match) {
    set $7g_drop_bad_method 0;
}
Hit CTRL+O and then Enter to save the file. Exit nano with CTRL+X.
Unlike 6G, the above exclusion leaves the $args alone. Previously, 6G whitelisting would interfere with some plugins $request_uri$args, but due to this update those same plugins that wouldn’t play nice with 6G will work fine with 7G.
Check and reload Nginx
To set your rule into effect you will need to check your Nginx syntax with:
nginx -t
If no errors are present, reload Nginx with:
gp ngx reload
Your rule is now active.
EXAMPLE 4. DISABLE A RULE SERVER-WIDE
Let us assume you want to open up your firewall by disabling specific rule sets, maybe you’ve seen this in your logs:
[03/Jun/2020:04:37:05 +0000] [":bad_querystring_7::bad_querystring_7:"] 111.222.333.444 dev.site.com "GET /wp-admin/admin-ajax.php?action=wp_reset_run_tool&_ajax_nonce=30166e1e57&tool=create_snapshot_step&extra_data%5Buid%5D=fvrzlw&extra_data%5Baction%5D=copy&extra_data%5Bdata%5D=wp_cli_scripts&extra_data%5Bdescription%5D=Copying+table+%3Ci%3Ewp_cli_scripts%3C%2Fi%3E HTTP/1.1" 403 "https://dev.site.com/wp-admin/tools.php?page=wp-reset" "Mozilla/5.0 (Windows NT 10.0; Win64; x64) AppleWebKit/537.36 (KHTML, like Gecko) Chrome/83.0.4103.61 Safari/537.36"
This particular example is from a plugin called WP-Reset, but you can use this example for other blocks.
To apply this server-wide, you would want to create the following file:
nano /etc/nginx/extra.d/querystring-whitelist-7g-context.conf
Within that configuration file add the following:
set $exclusion_rule_match "";
if ($bad_querystring_7g) {
   set $exclusion_rule_match 7;
}
if ($bad_querystring_7g = $exclusion_rule_match) {
   set $7g_drop_bad_query_string 0;
}
Hit CTRL+O and then Enter to save the file. Exit nano with CTRL+X.
This sets the rule to exclude based on the specific rule being triggered.
Check and reload Nginx
To set your rule into effect you will need to check your Nginx syntax with:
nginx -t
If no errors are present, reload Nginx with:
gp ngx reload
Your rule is now active.
Part 5. Real World 7G Whitelist Rule Examples
Now that we’ve covered the basics in the previous section on how and where to add your whitelist rules, here are some real-world examples of whitelisting without all the steps involved in creating the file, and checking and reloading Nginx which you can learn from the previous 3 examples.
When crafting rules, you can target any request using available Nginx variables, including the $uri, $request_uri, and $args variables. You can view a full list of Nginx variables here:
Alphabetical index of variables
WHITELISTING A QUERY STRING FOR SEOPRESS AND GOOGLE SEARCH CONSOLE
Whitelisting via $args
NOTE: The following is great if you use SEOPress on a WaaS network and you expect multiple clients to be connecting to Google Search Console. If that isn’t the case, the easiest and best solution is to simply deactivate the two rulesets, run the authorisation, and then turn the rulesets back on.
When connecting SEOPress to Google search console, the authorisation link results in two separate errors that looks as follows in the 7G log:
[17/Nov/2020:15:05:35 +0000] [":bad_querystring_12::bad_request_15:"] 199.199.199.199 yourdomain.com "GET /wp-admin/admin.php?page=seopress-google-analytics&code=4/0AY0e-g44ZrE9024kffJQ2LbRdRxVLOQgAruyU9wAHI1jYFCDaUo10xmwW5rpilPzqNKOSoaWlA&scope=https://www.googleapis.com/auth/analytics.readonly HTTP/1.1" 403 "https://accounts.google.com/" "Mozilla/5.0 (Macintosh; Intel Mac OS X 11_0_0) AppleWebKit/537.36 (KHTML, like Gecko) Chrome/86.0.4240.198 Safari/537.36"
We can exclude these two results by targeting “page=seopress-google-analytics&code” and adding an exclusion for both errors like so:
set $exclusion_rule_match "";
if ( $args ~* ^page=seopress-google-analytics&code ) {
set $exclusion_rule_match 15;
}
if ($bad_request_7g = $exclusion_rule_match) {
set $7g_drop_bad_request 0;
}
set $exclusion_rule_match “”;
if ( $args ~* ^page=seopress-google-analytics&code ) {
set $exclusion_rule_match 12;
}
if ($bad_querystring_7g = $exclusion_rule_match) {
set $7g_drop_bad_query_string 0;
}
WHITELISTING THE WOOCOMMERCE DOWNLOADS QUERY STRING
Whitelisting via $args and capture groups “(.*)”
WooCommerce downloads get flagged by bad_querystring_35. In this case, we can use capture groups for the query to be recognised successfully, and used the following exclusion to whitelist any URL that contains “&order=wc_order_” for this one specific rule in the bad_querystring_7g ruleset:
set $exclusion_rule_match "";
if ( $args ~* ^(.*)&order=wc_order_(.*)$ ) {
set $exclusion_rule_match 35;
}
if ( $bad_querystring_7g = $exclusion_rule_match ) {
set $7g_drop_bad_query_string 0;
}
WHITELISTING JETPACK AND THE WOOCOMMERCE SERVICES PLUGINS
Whitelisting via $uri
If you need to whitelist a specific plugin, you can use this example to craft your whitelist exclusion. Below is an example we’ve brought over from our 6G article and modified for 7G. Here we whitelist these two specific plugins against bad_request_7.
You can do the same with any plugin that you catch getting flagged by whitelisting the plugins URI path as in the example below:
set $exclusion_rule_match "";
if ($uri ~ ^/wp-content/plugins/woocommerce-services/) {
set $exclusion_rule_match 7;
}
if ($uri ~ ^/wp-content/plugins/jetpack/) {
set $exclusion_rule_match 7;
}
if ($bad_request_7g = $exclusion_rule_match) {
set $7g_drop_bad_request 0;
}
WHITELISTING A QUERY STRING FOR THE AMELIA PLUGIN
Whitelisting via $args
We’ve had a few cases reported where the Amelia plugin is getting flagged by bad_request_6. One of our clients gave us some great feedback on whitelisting this, and the exclusion they created will allow you to exclude Amelia from this one specific rule within the bad requests ruleset:
set $exclusion_rule_match "";
if ( $args ~* ^action=wpamelia_api& ) {
set $exclusion_rule_match 6;
}
if ( $bad_request_7g = $exclusion_rule_match ) {
set $7g_drop_bad_request 0;
}
REDIRECTION PLUGIN DATABASE UPDATE
Whitelisting via $request_uri
The Redirection plugin database update has been flagged by 7G for breaking bad_request_25. The plugin listed where things were going wrong, and the following rule allowed the database update to proceed:
set $exclusion_rule_match "";
if ($request_uri ~ ^/wp-json/redirection/v1/plugin/database/) {
set $exclusion_rule_match 25;
}
if ($bad_request_7g = $exclusion_rule_match) {
set $7g_drop_bad_request 0;
}
Note: On this one, my recommendation would actually be to simply toggle off Block Bad Requests inside the UI, run the database update, and then toggle Block Bad Requests back on. The same goes for any other instances where you don’t require ongoing whitelisting.
KADENCE CLOUD
Whitelisting via $request_uri
The Kadence Cloud plugin gets flagged due to the second URL inside the string. This same thing happens with SEOPress and Google Console as detailed above. Here though we’re going to whitelist via $request_uri instead of $args:
set $exclusion_rule_match "";
if ( $request_uri ~* ^/wp-json/kadence-cloud/v1/ ) {
set $exclusion_rule_match 15;
}
if ($bad_request_7g = $exclusion_rule_match) {
set $7g_drop_bad_request 0;
}
set $exclusion_rule_match "";
if ( $request_uri ~* ^/wp-json/kadence-cloud/v1/ ) {
set $exclusion_rule_match 12;
}
if ($bad_querystring_7g = $exclusion_rule_match) {
set $7g_drop_bad_query_string 0;
}
WHITELISTING A SEARCH QUERY STRING
Whitelisting via $args and capture groups “(.*)”
We had a case where the search results were getting flagged by bad_querystring_36. In this case we used capture groups for the query to be recognised successfully, and used the following exclusion to whitelist any URL that contains “ajax_search” for this one specific rule in the bad_querystring_7g ruleset:
set $exclusion_rule_match "";
if ( $args ~* ^(.*)ajax_search(.*)$ ) {
set $exclusion_rule_match 36;
}
if ( $bad_querystring_7g = $exclusion_rule_match ) {
set $7g_drop_bad_query_string 0;
}
Part 6. 7G Ruleset Customisation
One of the very cool things that 7G allows you to do is to delete any rules that’s causing you issue (like in 6G), but then modify it to remove the specific part that’s causing your problems, and add the rest back in as a new rule.
Each ruleset now has it’s own include: –
*7g-bad-bot-context.conf*7g-bad-referer-context.conf*7g-bad-querystring-context.conf*7g-bad-request-context.conf*7g-bad-method-context.conf
So, if we take a look at the 7g-mappings.conf by displaying it’s contents with:
cat /etc/nginx/common/7g-mappings.conf
We can see that each different ruleset, and that the rules within each ruleset are all numbered, 1 rule per line. It’s worth taking a good look at this file to get a handle on what all the rulesets do.
If we take a look at the $bad_request_7g block, you can see that this has 28 rules. Let’s say we want to modify rule number 16, because a specific part of this is giving us trouble. Rule 16 looks like:
"~*(/)(=|\%%EDITORCONTENT%%amp;?|&?(pws|rk)=0|_mm|_vti_|cgi(\.|-)?|(=|/|;|,)nt\.)" 16;
And, for example, let’s say we need to unblock the _mm part of this rule, but we want to keep the rest.
In 7G, this is now possible by first disabling rule 16, editing the above to remove _mm, and then adding it back in as new rule number 29 (remember, the bad requests ruleset has 28 rules, so our new rule needs to be number 29).
So our new rule looks like:
"~*(/)(=|\%%EDITORCONTENT%%amp;?|&?(pws|rk)=0|_vti_|cgi(\.|-)?|(=|/|;|,)nt\.)" 29;
Let’s put this into action as a server-wide rule.
STEP 0. SERVER-WIDE RULE OR WEBSITE SPECIFIC RULE
Inside the site specific 7G configuration file there are two includes that we can make use of to include our custom rules. You can view site specific conf with the following command (switching out site.url for your domain name):
cat /etc/nginx/common/site.url-7g.conf
Here you will see:
include /etc/nginx/extra.d/*7g-context.conf;
include /var/www/site.url/nginx/*-7g-context.conf;
If you would like your rule to be server-wide so that it applies to all of your websites you can make use of the /etc/nginx/extra.d/*7g-context.conf. If you only want the rule to apply to a specific website you can use the /var/www/site.url/nginx/*-7g-context.conf.
See part 4 above for more details.
STEP 1. EXCLUDE BAD REQUEST RULE #16
First create your whitelist config file using the server-wide wildcard or the site-specific wildcard. In this example, below would make the rule server-wide:
nano /etc/nginx/extra.d/bad-request-whitelist-7g-context.conf
Add the following to exclude our rule:
set $exclusion_rule_match "";
if ($bad_request_7g) {
   set $exclusion_rule_match 16;
}
if ($bad_request_7g = $exclusion_rule_match) {
   set $7g_drop_bad_request 0;
}
Hit CTRL+O and then Enter to save the file. Exit nano with CTRL+X.
I would immediately check your Nginx syntax, just incase a reload occurs before you have finished editing your new ruleset:
nginx -t
STEP 2. ADD OUR NEW EDITED VERSION OF RULE 16 AS RULE 29
Assuming the syntax check passed, you can move on to adding your edited custom rules.
Create the following config file:
nano /etc/nginx/extra.d/allow-mm-7g-bad-request-context.conf
Add our edited rule to the file like so:
"~*(/)(=|\%%EDITORCONTENT%%amp;?|&?(pws|rk)=0|_vti_|cgi(\.|-)?|(=|/|;|,)nt\.)" 29;
Hit CTRL+O and then Enter to save the file. Exit nano with CTRL+X.
STEP 3. CHECK AND RELOAD NGINX
To set your customised rules and whitelist into effect you will need to check your Nginx syntax with:
nginx -t
If no errors are present, reload Nginx with:
gp ngx reload
Your new rule is now active.
EXAMPLE 2: CUSTOMISING THE BAD BOTS RULESET
A client needed to remove “ahrefs” from bad bot rule #5 for SEO purposes. This is a quick rundown of how to do this.
UPDATE: The 7G ruleset has since been updated, so the rule for ahrefs is now different. Here’s the rule being broken in the log:
[05/Jan/2022:05:04:45 +0000] [":bad_bot_2001:"] 199.119.69.299 www.example.com "GET /eguides/bocas.js HTTP/2.0" 403 0.000 "https://www.example-venue.com.au/" "Mozilla/5.0 (compatible; AhrefsBot/7.0; +http://ahrefs.com/robot/)"
STEP 1. REMOVE THE BAD BOT #5 RULE
Create the exclusion file with:
nano /etc/nginx/extra.d/bad-bot-whitelist-7g-context.conf
Remove the rule with:
set $exclusion_rule_match "";
if ($bad_bot_7g) {
set $exclusion_rule_match 2001;
}
if ($bad_bot_7g = $exclusion_rule_match) {
set $7g_drop_bad_bot 0;
}
All bad bots will no longer be blocked, so we need to customize our rule and add it back in.
STEP 2. EDIT AND ADD THE RULE BACK IN
As mentioned earlier, each ruleset has its own include, so we’ll be using the bad bot specific one “*7g-bad-bot-context.conf”.
nano /etc/nginx/extra.d/allow-bots-7g-bad-bot-context.conf
Paste in the edited rule like so, changing the number to follow on from the last rule, which in this case was 2001, so our rule is 2002.
"~*(alexibot|majestic|mj12bot|rogerbot)" 2002;
Hit CTRL+O and then Enter to save the file. Exit nano with CTRL+X.
STEP 3. CHECK AND RELOAD NGINX
nginx -t
If no errors are present, reload Nginx with:
gp ngx reload
AN AMUSING FALSE POSITIVE
One false positive that was brought to our attention was a seemingly random page was having issues serving CSS and images, all returning a 404.
The cause, spotted by our client, was that the word “Specialist” in the URI, also contains the word “c i a l i s”, and this was being flagged by bad bots rule #5.
The fix for this was to simply remove that rule, edit it to remove that specific word, and then re-add it back in as a new rule – as demonstrated in the 3 steps above.
UPDATE: We also had a report of the bad request rule #24 triggering false positives through the word “conf”, which guards against .conf files. The rule in this case was being triggered by these two files:
/wp-content/plugins/buddypress/bp-core/js/confirm.min.js
/wp-content/uploads/confused.jpg
Part 7. Creating Custom Rules
We can use the functionality covered in part 4 to craft our own custom rules and add them to the 7G WAF.
An interesting example for this would be blocking troublesome bots that take up your server resources with absolutely no benefit to you or your clients. 7G actually has an excellent list of bots that it will automatically block from the get-go, but you can also add your own custom rule to block other bots. We’ll use this use case as our example custom rule.
EXAMPLE RULE: BLOCKING ADDITIONAL BAD BOTS
7G will block bots based on the user_agent name, so as long as you know that, you can create a custom rule to block any bots you want with 7G.
To do, this you can first create a configuration file making use of the *7g-bad-bot-context.conf include as follows:
nano /etc/nginx/extra.d/blockbot-7g-bad-bot-context.conf
The $bad_bot_7g block has 5 rules by default, so our custom rule will be number 6. The rule will look as follows:
~*(botname1) 6;
If you’re blocking more than one bot you can separate them like so:
~*(botname1|botname2) 6;
For example, here is a list of some bots that have been flagged by the “Bad Bot Blackhole” plugin (also created by Jeff Starr) on one of my websites:
~*(adsbot|aiHitBot|Barkrowler|clarabot|mauibot|scrapy|smtbot) 6;
Hit CTRL+O and then Enter to save the file. Exit nano with CTRL+X.
CASE SENSITIVITY
The ~* at the beginning of the rule (as opposed to just a ~) makes this rule case insensitive, so you don't need to worry about naming bots with the correct uppercase/lowercase letters.
CHECK AND RELOAD NGINX
To set your rule into effect you will need to check your Nginx syntax with:
nginx -t
If no errors are present, reload Nginx with:
gp ngx reload
Your new custom rule is now active.
IMPORTANT
Do NOT copy exclusions and whitelisting 6G WAF rules into 7G. Exclusions for these 2 WAFs do not operate the same way, and the same rules may not be necessary. Copying 6G rules over to 7G will cause an Nginx syntax failure and prevent it from being able to restart, potentially taking Nginx offline.