Verdant TCS

Changing a Website’s Primary Domain: Switch with an Alias (Domain Swaps)

5 min read

INFORMATION/RECOMMENDATION

Domain swaps are destructive by nature, meaning that in the unlikely event that something goes wrong, both the original site, and the new site will both be affected. For most use cases, cloning the site to the new URL is the better option.
Cloning a site to a new URL on the same server

IMPORTANT: MULTISITE NOTICE

Please note that domain swap functionality (as well as cloning and staging functionality) does not work with WordPress multisite. It is only available for regular WordPress installations. More info at the bottom of this article.

Introduction

vCanopy includes functionality in the Control Panel to manage and configure the domains for your WordPress sites.

The primary domain of the vCanopy site is what we think of when we think of the site URL. In this article we’ll cover how to switch the primary domain using an Alias.

Before we can change the primary domain, we first have to create the new domain as an Alias. To do this, we have a thorough walk through that you can view here: –

Adding an Alias Domain to a vCanopy Site

Once you have an Alias set up, below are the steps to change your websites primary domain.

Cloning vs Domain Swapping

vCanopy offers the ability to swap your website’s domain or clone from one domain to another. In most cases, cloning instead of swapping domains may be the better option and is what we recommend.

The domain swap process is more resource intensive and also means that any previous backups of the website will no longer be accessible, as backups are attached to a specific domain name.

With cloning, your backups remain available on the original domain, and should any issues occur during a clone, the original site will be unaffected. With a domain swap, should anything go wrong, both the new and old sites can be affected.

These articles detail how to clone your website to a new domain on a new server, or a new domain on the same server:

Step 1: Domain Swap Preparation 

There are some steps that may be necessary and speed up the time it takes to run the swap.

STEP 1.1: ENSURE THERE’S ADEQUATE DISK SPACE

To prevent your domain swap from running into issues, our systems require an additional 110% of your sites disk space to be available to ensure that a full backup can take place beforehand and that there are no disk space-related issues that could cause the domain swap to fail.

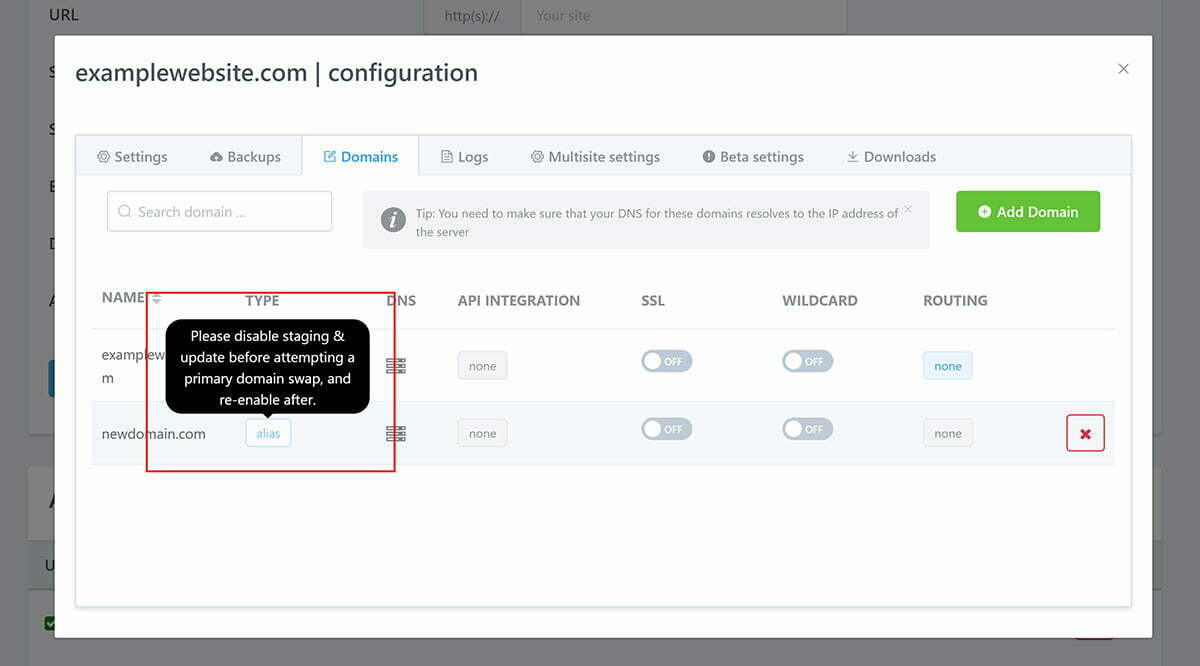
STEP 1.2: DISABLE THE STAGING AND UPDATE (CANARY) SITES (IF THEY EXIST)

To make the domain change, you’ll first have to disable the staging and update websites for this domain if they exist. Inside the configuration modal > Domains tab, you’ll see this notification if these exist.

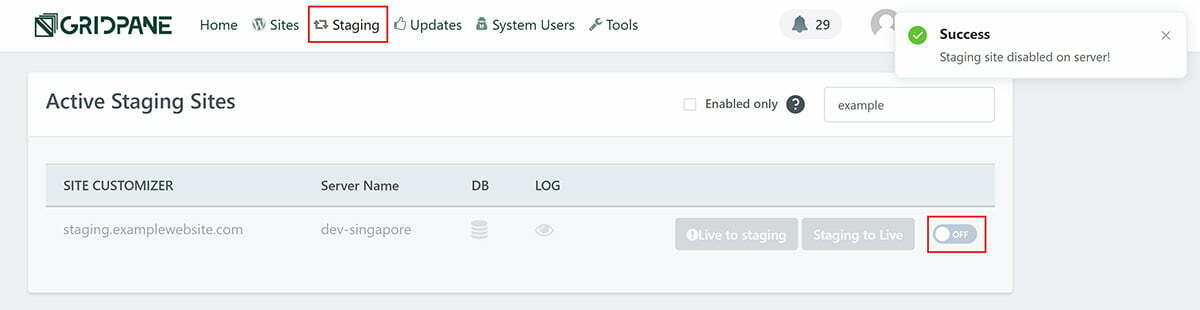
Turning these off is quick and easy. Simply navigate to the Staging and Update pages inside your dashboard and toggle them off for the website on which you’re switching the domain. The image below demonstrates disabling the Staging website. The process is the same for a Canary website (located in the Updates page) if you also have this enabled.

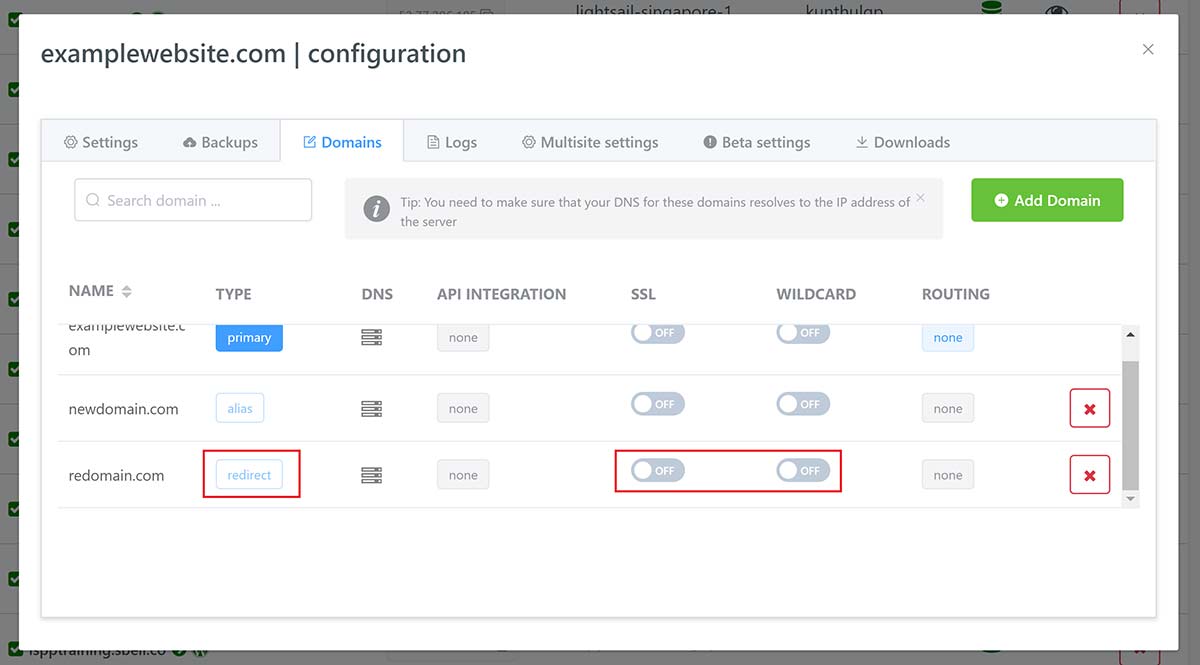
STEP 1.3: DEACTIVATE ANY 301 REDIRECT SSL’S

Next, if you have any 301 redirects attached to this website and the redirect has an SSL certificate, you will need to deactivate the SSL before proceeding. If there are any 301 redirects that have an active SSL, the domain change will fail. You can easily deactivate any redirect SSLs by toggling them off as shown below.

STEP 1.4: SPEED UP DATABASE REWRITES

The domain swap will initiate a search and replace in your database to swap your URLs over.

You can reduce the time this takes by ensuring both the live and alias domain have an SSL certificate before the swap begins.

If both domains have an SSL certificate before the swap/push, the system doesn’t need to check for HTTP/HTTPS URLs and can use a simpler compound regex.

If neither the primary nor alias domain have an SSL, and it will run efficiently as is.

You can learn more about vCanopy search and replace functions in this article:

vCanopy Database Rewrites and Workflow

Step 2: Swapping the domain

We’re now ready to make the primary domain change. Navigate to the website and open the configuration modal, then click on the domains tab. Click on the Alias that you wish to become the primary domain and you’ll see this notice:

Confirm you’ve selected the correct Alias and click Save. The process may take some time to complete, and notifications will be displayed inside your account as different stages of the process are completed.

Multisite Information

The reason Multisite domain swapping (as well as cloning to a new URL and making staging pushes) is not available in the app is because of the complexity and potential for error and failure.

Domain swapping is a resource-intensive process with a lot of moving parts and, as mentioned in the infobox at the top of this article, it is destructive by nature. WordPress-focused hosts don’t offer this functionality as automated tools simply are not the correct way to make such a dramatic change on a multisite.

If you need to move a multisite from one domain to another it will need to be done manually via a migration.

Also, manually updating a site at the site level (running a search and replace, changing the wp-config.php file) to force a domain swap is going to run into issues with our systems.

The alias domain is still using an alias config at the Nginx level.

  • The primary domain is still using a primary config at the Nginx level.
  • Any alias domains used for mapped domains are all still configured to the primary domain.
  • All the supporting Nginx include templates are set for the primary domain, including includes and directory structure, server-level filepaths, and directory paths.


The way to do a primary domain swap for a multisite is to use a plugin that handles multisite migrations, such as All in One WP Migration with the multisite extension, and build a new site on the new domain, then add any alias domains to it.

Search the Knowledge Base

New to vCanopy?

Get started with our FREE Core plan today! We bring the software, you bring the hardware.